The Gskyer AZ70400 is one of the more popular starter telescopes sold online. A small, portable 70mm alt-azimuth refractor – it comes with all the basics plus a few extras, and its price is hard to beat. So, I wanted to try it out and see if it deserves its best-seller status. In this Gskyer 70mm telescope review, I’ll share with you what I liked and didn’t like, and whether I would recommend spending the money on it.
See also:
Spoiler alert: While it’s not perfect, the optics were a little better than I expected. Adults will find the telescope a little awkward to use with its short tripod and 48-degree diagonal eyepiece adapter – but it’s a good fit for kids.
It’s comparable to Celestron’s 70mm Travel Scope, and Orion’s 70mm GoScope III – with the main differences being: (1) the Gskyer includes a smartphone mount, wireless remote, Barlow lens, and eyepiece rack (worth maybe an extra $20-25 or so), and (2) the Gskyer is less of a household name brand in the astronomy community. (For all the differences, see our comparison table at the end of this review.)
Review: Gskyer 70mm Alt-Azimuth Telescope (Model AZ70400)
Just remember, there will always be compromises when you’re buying any telescope that costs less than $100 or so—you will get what you pay for, and anyone who tells you differently is pulling a fast one.
However, our Gskyer 70mm telescope review will objectively lay out the pros and cons, so you can decide if this telescope is a good fit for your needs and budget. I’ll explain its features, ease of setup, and other key considerations. And, I’ll talk about what that actually means for you, in terms of how much you can see and how easily you can use it.
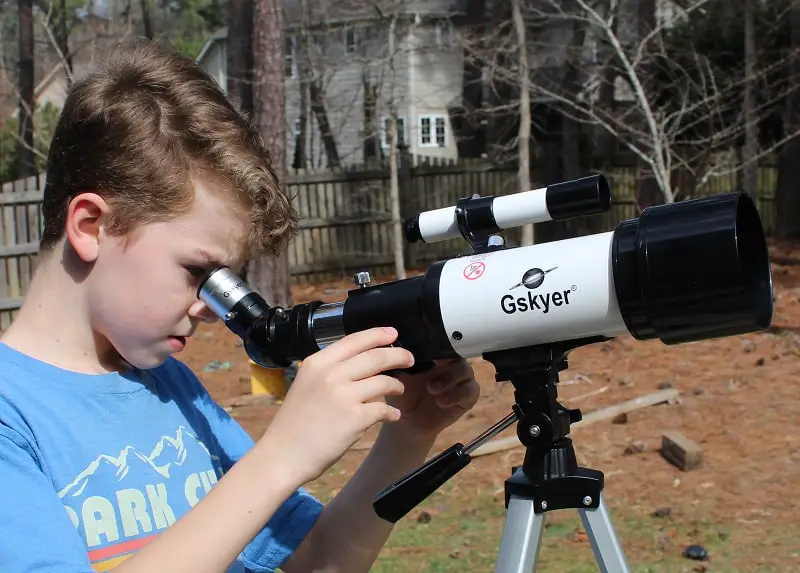
Image Credit: Brian Taylor / TelescopeGuide.org
Basic Specs
- Type: Refractor
- Aperture: 70mm
- Optics: Glass, fully-coated
- Weight: 5.71 lbs.
- Eyepieces: Kellner type, 2 included (10mm and 25mm)
- Magnification: 16x and 40x with included eyepieces (or 48x and 120x with 3x Barlow lens)
- Focal Distance: 400mm
- Focal Ratio: f/5.7
- Finderscope: 5×24
- Mount: Alt-azimuth with included tripod
- Warranty: Two years
Accessories Included
- Carrying case for telescope and tripod
- Camera-type tripod – adjustable, aluminum alloy, collapses for compact storage
- 3x Barlow lens
- Eyepiece rack, attaches to tripod
- Smartphone adapter
- Wireless remote for taking images with smartphone (includes a battery)
- Instructions for setting up (full color, with pictures)
- Lens cloth
- 5×24 finderscope with mounting bracket
- Erect image diagonal (48-degrees)
Who is Gskyer, and is it a Good Brand?
I have to admit – I had never heard of Gskyer before I started running this astronomy website a few years ago. But I noticed the popularity of this particular Gskyer model online… so it piqued my interest. (We normally stick with the major brands when recommending telescopes… Celestron, Orion, Sky-Watcher, Meade, and a few others.)
It’s difficult to find information online about the Gskyer brand. According to this article, Gskyer was previously a company based in Germany, but now it’s just a brand name being used by a Chinese manufacturer. (Keep in mind that Celestron and Orion are also manufactured in China.) There appears to be a website (in Chinese language), but there isn’t much information there about the company or the products. And there is no contact information provided for other countries.
So, what does that mean if you’re thinking about buying this telescope?
Well, it really depends on what you’re looking for. If the brand name is important to you, or you want better support and customer service, then you should probably go with another brand. However, if budget is more important, then you might be able to save a few bucks (on what seems to be a nearly identical telescope, plus some extra accessories) with the Gskyer brand.
Highlights: What I Liked
Here’s what I liked about the Gskyer AZ70400:
1. Optical quality was better than I expected. Images were sharp and clear, and it was easy to get a nice image. (But some other online reviewers struggled to get a good image… keep reading below for my tips on getting started.) The 70mm fully-coated objective lens is enough to glimpse a good variety of targets including some of the brighter deep sky objects.
2. Great price, given the set of starter accessories. I’ll probably keep the telescope and use it as an “extra” for the kids when I go out stargazing.
3. It was easy for my 9 year old son to figure out how to use the telescope with almost zero instructions – he played with it for a while during daylight hours, trying different eyepiece combinations and adjusting the focus. (At nighttime, in the dark and with dimmer targets, he needed more help.)
4. Small, compact, and very lightweight – and came with carrying bag for both telescope and tripod.
5. For terrestrial / daytime viewing, the 48-degree erect image diagonal is great. It’s easy and intuitive to move the telescope around because the image is always right side up, which is good for beginners. (However, this type of diagonal can be problematic for nighttime viewing high above the horizon.)
6. I liked the smartphone attachment and wireless remote. Most other 70mm budget-range telescopes don’t include this. The wireless remote synced easily with Bluetooth on my phone, and it was easy to take a pretty good image with it. (See picture below.)
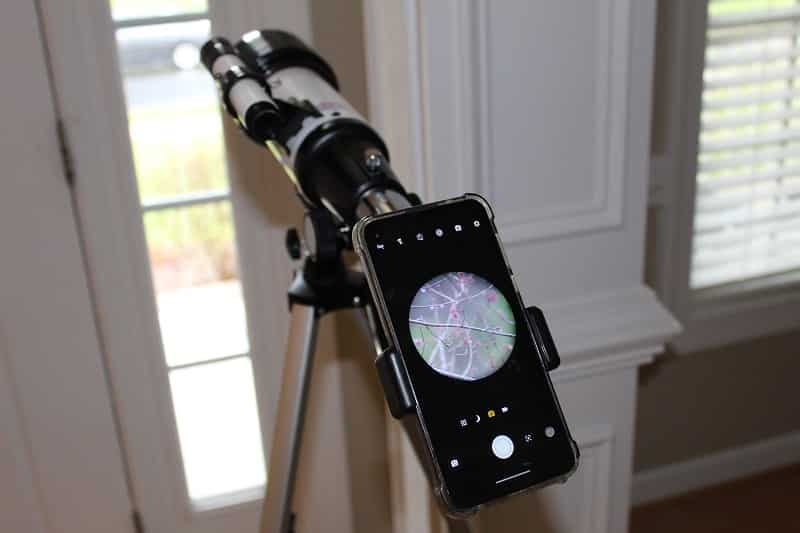
Image Credit: Brian Taylor / TelescopeGuide.org
What I Didn’t Like
1. The Kellner eyepieces are OK, but all the other accessories seem to be cheaply manufactured. No surprises here, given the price category… but it’s worth mentioning. (It’s important to set expectations appropriately on this – don’t expect great quality on all the accessories for a budget telescope.)
2. The narrow field of view on the eyepieces (especially the 25mm) made it a bit difficult to find the perfect angle for looking into the eyepiece. This could be off-putting to a beginner or a kid with no experience looking through telescope eyepieces. (At least, until you get the hang of it.) Again, no surprises here given the price range. Better eyepieces will be more expensive, but also easier for kids and beginners to use.
3. For an adult, the tripod is way too short. And, to make things worse, it’s even more awkward because of the 48-degree diagonal. Don’t even try looking straight up, unless you get on the ground and you have a very flexible neck. As an adult, you’ll need to sit in a chair, and you’ll probably want to select viewing targets that are less than 50-60 degrees or so above the horizon. (Note: The Celestron and Orion competitor models are nearly the same as the Gskyer in this regard.)
4. The instructions are great for setting up, but they don’t tell you anything about actually using the telescope. Some of the user reviews online stated they couldn’t find anything with the telescope, and I believe it’s partly because some people don’t yet know how to calibrate and use the finderscope, or how to find something and get it focused in the eyepiece.
5. The 5×24 finderscope is plastic, and nearly worthless. The cross-hairs were essentially non-existent in the dark. Also, I couldn’t quite calibrate the finderscope perfectly, so I had to settle for a slight misalignment. As a result, I found myself avoiding the finderscope completely and just using the low-power (25mm) eyepiece instead. It’s worth saying that many budget telescopes have this same problem.
Is the Gskyer 70mm Worth Buying?
So … let’s cut to the chase. Should you spend your money on this telescope? Provided you have the right expectations, I can see why the AZ70400 is so popular. The Gskyer 70mm can help make the most of a tight budget, especially if you’re shopping for kids or if you just want something to discover a bit more of the sky than you can see with your eyes alone.
(By the way… if this will be your first telescope, or you’re buying this telescope as a gift, I would recommend getting a beginner astronomy book to go with it.)
Pros:
- It comes at a great price point, and includes everything you need to get started
- It’s small and portable; super easy to setup and use
- Easy for kids, and you can also use it for daytime viewing, wildlife, etc.
- Decent optics – will provide good views of the moon, brighter planets, and even give you a faint glimpse of a number of deep sky objects
- Comes with some nice upgrades compared to some other 70mm budget telescopes, including a smartphone mount, wireless remote, Barlow lens, and eyepiece rack that attaches to the tripod
Cons:
- Adults will need to use it in a seated position, and you’ll be limited by the viewing angles
- The accessories are somewhat flimsy (but you should really expect that to be true in this price range)
- If customer service and support are important to you, you might prefer to go with one of the more established astronomical brand names, like Celestron or Orion
Scorecard – Gskyer 70mm AZ Mount Refractor Telescope
| Category | Our Verdict | Why? |
|---|---|---|
| Skill Level | Kids and Beginners | Aimed at people just getting started |
| Quality | 3 out of 5 | Designed to be as light and inexpensive as possible |
| Ease of Use | 4 out of 5 | It doesn't get any simpler to use, as long as you're not looking straight up |
| Power & Clarity | 2 out of 5 | Not a high-powered telescope |
| Control | 3 out of 5 | Simple AZ mount / tripod |
| Portability | 5 out of 5 | Ultra-lightweight and highly portable |
| Accessories | 3 out of 5 | Comes with a carrying case and a smartphone mount |
| Overall Value | 4 out of 5 | Great value |
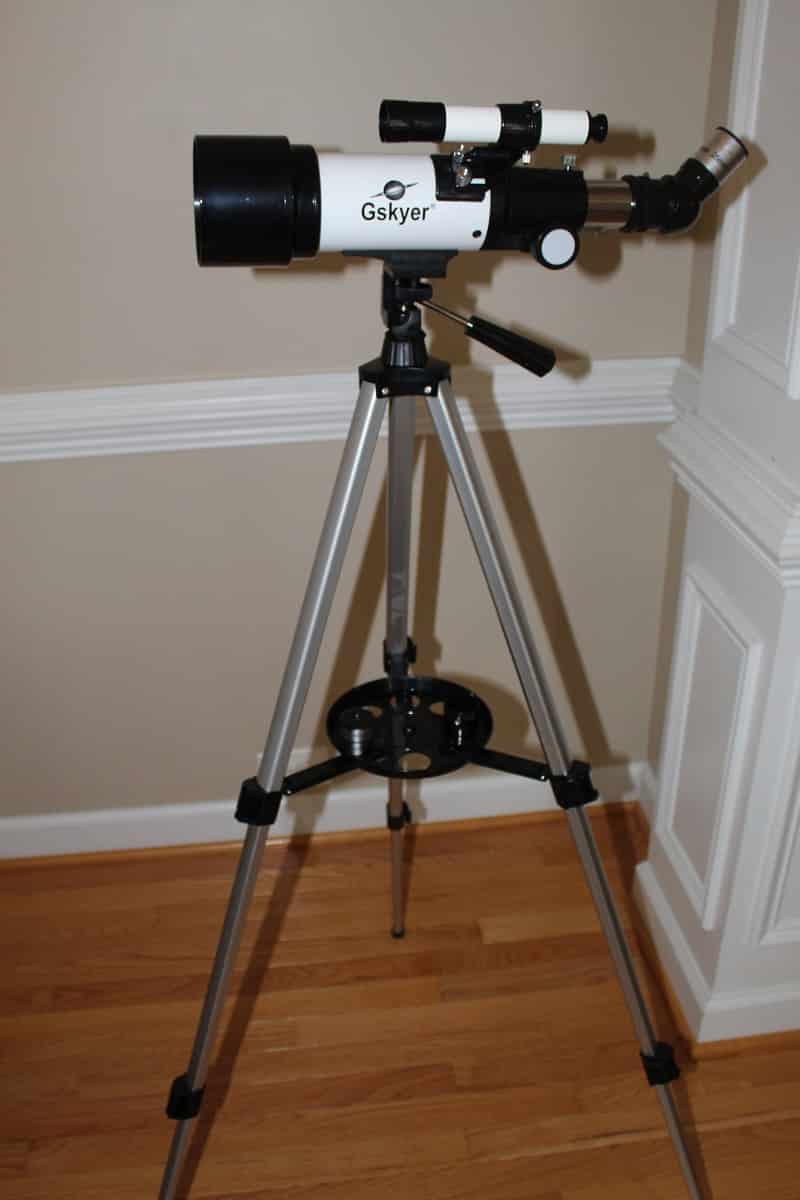
Image Credit: Brian Taylor / TelescopeGuide.org
Using the Gskyer 70mm Refractor Telescope
Initial assembly
Whether you buy a $100 or a $1,000 telescope, the first (and sometimes biggest) hurdle is to assemble it out of the box.
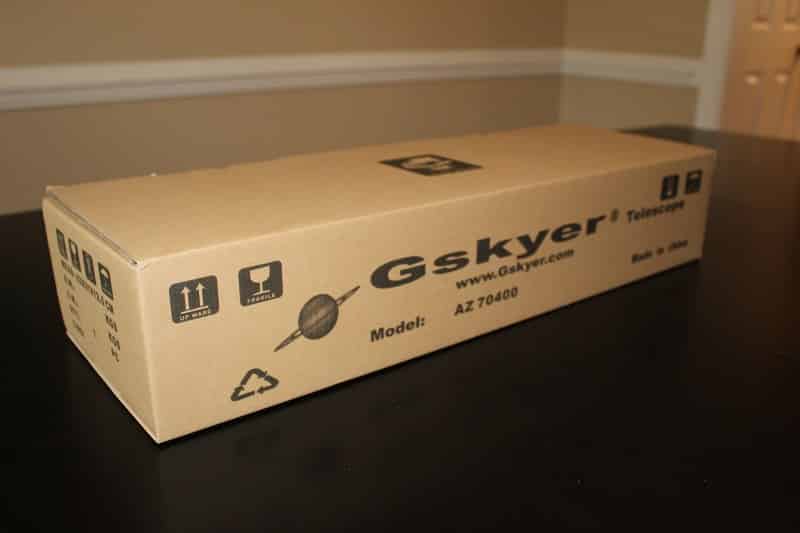
Image Credit: Brian Taylor / TelescopeGuide.org
For beginners, the Gskyer AZ70400 70mm telescope is less overwhelming to put together because it has fewer components. It took me about 5-10 minutes to take the telescope out of the box and set it up for the first time.
The box includes a basic pamphlet with good visual instructions for getting setup, and you can find tutorial videos on the internet. However, there are no manuals to teach you how to actually use the telescope, which is rather odd since it’s marketed for beginners and kids. You will have to learn it on your own, and look for additional materials or videos online.
That’s why if you’re getting this for kids, the adults have to be prepared to do a lot of initial guidance and research.
Despite the lack of usage instructions, it’s really pretty simple: (1) Put everything together using the visual instructions. (2) Spend some time calibrating the finderscope during daylight hours. (3) Make sure you practice focusing and swapping out the eyepieces before you take it out stargazing. That’s pretty much it.
Accessories
The Gskyer AZ70400 70mm telescope comes with a complete set of starter accessories for your stargazing journey. (And, as I’ve already mentioned, don’t expect high quality accessories in this price range.) This includes 2 eyepieces, a 3x Barlow lens, a 48-degree diagonal / zenith mirror, tripod, finderscope, a Bluetooth remote and smartphone adapter that will allow you take photos with your telescope, a carrying case, and an accessory tray.
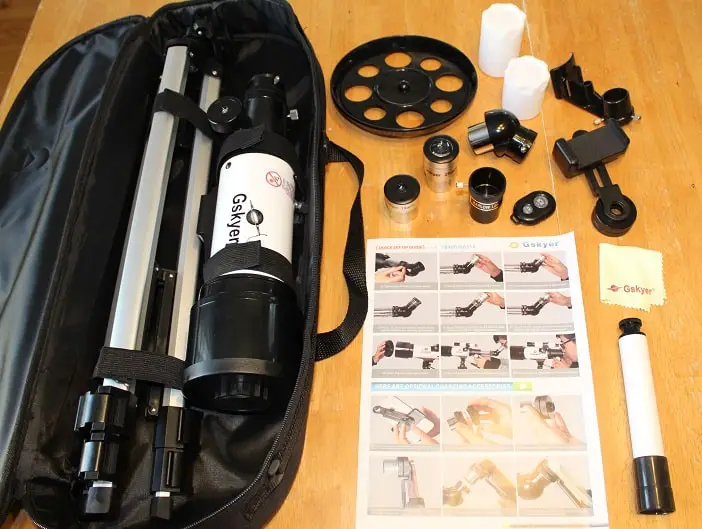
Image Credit: Brian Taylor / TelescopeGuide.org
The accessories package makes the overall telescope kit a great value. While they’re not the sturdiest or most powerful items, they will allow you to experiment with all the telescope’s features. Let’s take a look at the more important accessories.
Additional eyepieces
The Kellner eyepieces performed pretty well in my first few outings with this telescope. Images were sharp. The quality is at an acceptable level for the telescope’s price category. (But of course, it would be nice to have more expensive eyepieces with a wider field of view and better eye relief.)
The first eyepiece has a focal length of 25mm for 16x magnification. While it won’t let you see objects up close, the wide field can help you find and identify objects.
The second eyepiece is 10mm for 40x magnification, so you can use it to get “closer” to your subject. Bear in mind that you still won’t be able to see a lot of details, especially in less-than-perfect viewing conditions.
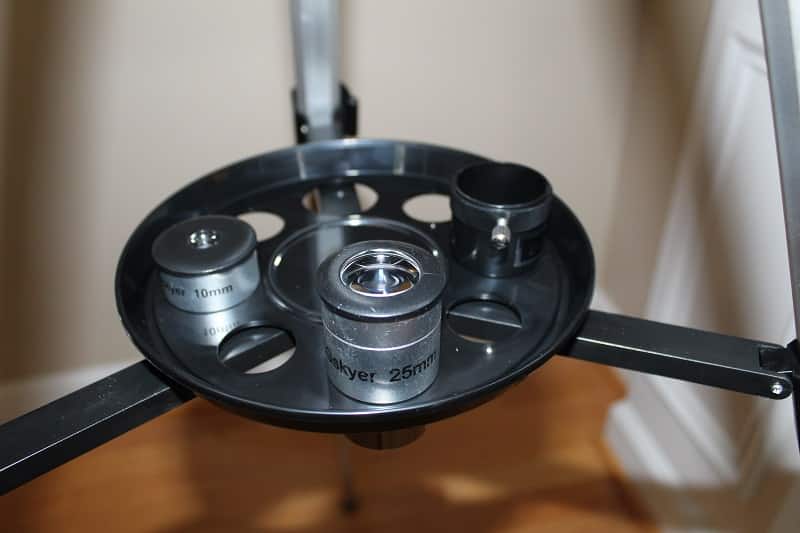
Image Credit: Brian Taylor / TelescopeGuide.org
While the eyepieces give you limited magnification by themselves, you do get a 3x Barlow lens that can triple the magnification power—so, up to 48x and 120x. However, don’t expect too much here, for 2 reasons. (1) The included Barlow lens is plastic and relatively low quality. The images are OK but could be a lot sharper with a better lens. (2) With a 70mm aperture, your highest theoretical magnification (under ideal viewing conditions) is only ~137x (that’s 50 times the aperture in inches). Which means 120x is close to the top of this telescope’s range.
But it’s nevertheless nice to have a Barlow included with the kit. You’ll be able to see closer images of the moon, some planets, and star clusters. Try using it for bird-watching or nature viewing, too. You’ll be able to see beautiful details like the markings on feathers, or distant treetops.
Tripod
I was admittedly disappointed by the tripod. It’s light and flimsy. While you can’t easily knock it over, any shaking interferes with the quality of the image.
The tripod is also short, so any adults or teens will have to sit, stoop, or kneel to use it. On the upside, it is a good height for young kids—so perhaps this weakness can be a benefit, depending on the primary user.
The height, combined with the rather flimsy construction, make this telescope more convenient to use when it’s on a sturdy table. (Also, when you adjust the tripod legs to fully extend, it becomes more unstable.)
While some other online reviewers found the tripod difficult to adjust – I didn’t have too much trouble here. (I was able to find a good “sweet spot” tension in the handle, and I just kept it there during my viewing sessions.) However, because of the shape of this tripod (i.e. no extension pole above the legs), you will have trouble adjusting the telescope to point directly up. Also keep in mind that unlike more expensive equatorial mounted scopes, you won’t be able to track objects very smoothly as they move.
Luckily, you can easily replace the tripod with something sturdier. (Any camera tripod will do.) If you’re willing to make that expense down the road, don’t let this feature hold you back.
Calibrating and using the finderscope
The finderscope that comes with the Gskyer 70mm refractor is a 5×24 – and I’ve already mentioned my opinion that it’s nearly worthless. I personally found myself skipping the finderscope altogether because the telescope itself is already fairly wide field and low-magnification with the 25mm eyepiece.
It’s plastic, low-quality, and I was unsuccessful in getting it perfectly calibrated. With that said… it can be used, as long as you’re looking for something fairly bright in the sky and you spend some time calibrating it as well as you can. It’s also about the same thing you’ll get with the Celestron and Orion 70mm travel scopes.
(Note: 5×24 means 5x magnification with an aperture size of 24mm. Basically, a mini-telescope mounted on top of the telescope.)
Tips on using the finderscope:
First, make sure you calibrate the finderscope during daylight hours. Follow these steps:
- After you assemble the telescope, insert the 10mm eyepiece and point the telescope at a distant object in your neighborhood. (You could pick a recognizable treetop, or the corner of a house or rooftop down the street a little bit.)
- Use the focuser to get your target into sharp focus. (This is also a good way to practice getting comfortable with the different eyepieces and focusing the telescope.)
- Make sure your target is centered in the eyepiece, then tighten the tripod handle to make sure it stays there.
- Now – being careful not to move the telescope – use the 3 screws on the outside of the finderscope to adjust it until your target is perfectly centered in the finderscope. Continue tightening until the finderscope is secure and can’t move anymore. (Note: The finderscope itself may need to be refocused a little bit, by twisting the end left or right.)
- Re-check the eyepiece and make sure that what you’re seeing in the telescope eyepiece is exactly what’s in the center of the finderscope. If not… then go back to step 1 and try again.
Second, keep in mind the finderscope image is inverted. Spend some time during daylight hours practicing finding something in the finderscope, then looking into the telescope eyepiece. Try several different eyepiece combinations, including the Barlow lens, and adjust the focus to get a sharp image each time. You’ll start to get the hang of the inverted finderscope. For a first-time telescope user, it’s a bit awkward.
The above tips will make it a lot easier to use the finderscope for stargazing. However, you’ll notice that dim stars are a lot harder to find (even in the finderscope) than bright neighborhood trees and houses. It takes some practice.
Optics
I thought the Gskyer AZ70400 provided pretty good optics. I like the short 400mm focal length for beginners and kids (because it provides a wide field of view). And I found the images to be clear and sharp. The 70mm aperture provided the level of brightness that I would expect for this size telescope.
The 70mm objective lens seems to be decent quality. The optics are fully-coated with anti-reflective coatings, and the closed optical system provides additional protection from moisture. So if you take it out on camping trips, it won’t suffer from the damp or a sudden rainshower. (It’s not water-proof, but at least it’s not delicate—and if you’re giving a telescope to kids, that’s a big factor.)
But what does that mean in terms of what you’ll actually be able to see?
1. You’ll get clear views of the moon, Jupiter and Saturn—anything that has a bright profile and is fairly easy to locate. (None of the planets were visible in the nighttime sky when I first tested this telescope, but I’ll come back and update this review at a future date. I was able to catch the moon from my front porch in its waxing crescent phase, showing fairly crisp detail at 40x magnification, including craters and shadows near the terminator.)
2. You can also spot some famous deep sky objects like the Andromeda galaxy, and brighter nebulae like the Orion nebula. (From my light-polluted backyard, Andromeda was visible but very faint. Orion was brighter and easier to find. Its smoky-white appearance formed a beautiful backdrop for the trapezium stars, and looked nice at both 16x and 40x.)
3. You’ll also be able to see a number of other DSO’s (deep sky objects) including some star clusters like the Pleiades and Hyades. Just be sure you have the right expectations – a 70mm aperture will show you glimpses of the largest and brightest objects, but you won’t get a lot of detail. (And many DSO’s will simply be too faint for this telescope.)
Bluetooth remote and smartphone adapter
Not many telescopes come with this accessory, so this is a pleasant surprise. You can view objects through your screen—which is particularly useful for young kids, since the whole family can look at the image at the same time, and you can explain the objects or compare it to a reference book.
The picture-taking capability is great for capturing the memory or sharing it on social media, though it is too limited for someone who wants to explore astrophotography. Consider this more of a “bonus” rather than a reason to buy.
The wireless remote is helpful because it allows you to take a picture without shaking the tripod, so it reduces blurring in your images.
Note: There were no instructions provided for how to use the wireless remote with your phone. However, it wasn’t difficult. It came with a battery, so you just turn it on, then go to your phone’s “pair new bluetooth device” and that’s it.
Simplicity and convenience
Once you know how to assemble and use the Gskyer 70mm, maintaining it is a breeze. All you have to do is mount it on the tripod, and you’re ready to explore the skies. The entire assembly takes just minutes—making it very convenient to store it when it’s not in use.
One of the biggest benefits of the Gskyer telescope is that it doesn’t need collimation, i.e. the alignment of optics to get a clear image.
That’s very important for beginners or young children who can easily get frustrated when the “telescope isn’t working.” Even if you get a more powerful telescope that needs collimation, you won’t be able to enjoy the features if you don’t know how to set it up and adjust it.
Portability
The telescope and all its accessories are light and neatly fit into the included carrying case. In total, the items will weigh about 6 pounds and the telescope has a tube length of 18 inches—so it’s light and compact enough for even a child to lug up a hilltop or bring on a trip. It’s perfect for travel, hiking, or camping.
Parents may ask, “Can my kids set it up without any adult supervision?” Yes. Once kids are taught to properly use the telescope, they can definitely take it out of the case and use it on their own. The tripod is also easy to collapse or unfold, and the telescope securely attaches.
Note: While I liked the case and the velcro straps inside, it does not include pockets for storing accessories. If you don’t want them clanging around inside the case, you may need to wrap them in a small towel inside the case.
Versatility
The Gskyer 70mm can be used for both astronomy and terrestrial viewing. This is a big plus for any telescope for beginners and kids. Not only do you get more bang for your buck, but you also have more chances to practice in “everyday” situations like nature-watching or viewing faraway buildings.
The more hands-on use you have, the more skilled and confident you will be when you’re trying to view even more distant objects like stars and planets.
Who should get the Gskyer AZ70400 70 mm telescope?
There is really no such thing as the best telescope for everyone. Powerful telescopes will be heavier and more expensive, and require skills like collimation. Budget telescopes will have limited optics. Some telescopes will also be built for specific interests, such as astrophotography.
So to be very fair and objective, our Gskyer 70mm review takes those different specs and needs into consideration—and eventually, arrive at the following recommendations.
The Gskyer AZ70400 70mm’s features and price make it a good choice for:
- Beginners who don’t want to overspend. You’re interested in astronomy, but you’re not willing to spend hundreds of dollars for a weekend hobby. At less than $100, you already get a telescope and accessories—and the option to buy better eyepieces or accessories when you become more serious about astronomy.
- Gift for children. Several factors make the Gskyer one of the best telescopes for children: the simplicity of use, the size and weight, and the durability. We all know that kids are easily frustrated, and may not be as careful with equipment as we’d like them to be. They can use the telescope without any trouble, and if they accidentally scratch or break it you won’t feel too bad.
- Families. You may already be a serious stargazer with expensive equipment of your own, but you want to share your hobby with other people. This can be a second telescope that friends and family can use when they go stargazing with you—and with your skills and expertise, you’re in the best position to help them maximize its potential.
- Casual astronomy for travel. Perhaps you enjoy hiking or camping, and would like to bring along a telescope to enjoy the night sky during your trips. In this case, the Gskyer’s price and portability are a big plus. It can fit into the trunk of a small car, can be carried around without any trouble, and is easy to pack away.
The Gskyer AZ70400 70mm is not suitable if:
- You are mostly interested in faint, deep sky objects. For faint deep sky objects, this telescope simply does not have the capability. In some cases you might see a smudge in the eyepiece, but for the majority of dim DSO’s you’ll need to invest in a more powerful telescope from the beginning.
- You want to pick out a lot of detail in the planets. For example, you won’t be able to see details within Saturn’s rings, or the bands of Jupiter. You’ll be able to make out their shapes, but you’ll need higher power and more aperture for close-up detail.
- You want digital help for identifying and tracking objects. This is a manual telescope. There are other telescopes that will track objects or come with built-in celestial maps, though these will definitely cost a lot more.
Alternatives
The closest competitors to the Gskyer 70mm are the Celestron 70mm travel telescope and the Orion 70mm GoScope III. These telescopes are nearly identical, with the following key differences:
- The Gskyer includes more bonus accessories, while the Celestron comes with a free software download and the Gskyer comes with a nice moon map.
- Gskyer is not a US-based company and doesn’t appear to have a US support team.
- The Celestron and Orion telescopes have a backpack, while the Gskyer comes with a tote bag instead.
Here’s a comparison table I put together:
| Category | Gskyer 70mm Telescope AZ70400 | Celestron 70mm Travel Scope | Orion 70mm GoScope III |
|---|---|---|---|
| Focal distance | 400mm | 400mm | 400mm |
| Aperture | 70mm | 70mm | 70mm |
| Optics | Glass, fully coated | Glass, fully coated | Glass, fully coated |
| Bonus items | Smartphone mount, Wireless remote, Eyepiece rack, 3x Barlow lens | Free software download | Orion MoonMap 260 |
| Support | 2 year warranty | 2 year warranty | 1 year warranty |
| Company | No contact information outside China | US based support | US based support |
| Case | Tote bag | Backpack | Backpack |
| Eyepieces | Kellner, 25mm and 10mm | Kellner, 20mm and 10mm | Kellner, 20mm and 9mm |
| Finderscope | 5x24 | 5x24 | 5x24 |
| Diagonal | Erect image (48 degree angle) | Erect image (45 degree angle) | Erect image (45 degree angle) |
| Tripod | 46" alt-az, adjustable | 52" alt-az, adjustable | 43.5" alt-az, adjustable |
Final Thoughts: Gskyer 70mm Telescope Review
The Gskyer takes out all the “barriers” that may be stopping you from enjoying stargazing: high price, complicated settings or collimation, cumbersome set-up, overwhelming features, or fear of “breaking” something.
It’s very affordable. Think about it: you get a decent telescope and the accessories for less than the price of a smartphone or tablet. You’ve paid a lot more for a phone that lets you take better selfies, but this one will actually let you take pictures of the stars.
It’s a fantastic gift for kids, and a much more educational alternative to getting them another video game or toy that they’ll quickly tire of.
And if you’ve always been curious about astronomy but are worried that you’re not “tech-savvy” or “you’ve never done this before”, rest assured that the Gskyer’s assembly and features are just as easy as any other gadget or appliance. If you figured out how to use a microwave, you can figure out this telescope.
Anyone can get into astronomy. And the Gskyer AZ70400 70mm telescope is a good place to start.
(Also, if you liked this article, please share it using the social media buttons below!)About the Author
Brian Taylor: Brian runs TelescopeGuide.org and loves stargazing, learning, and helping others learn about science and space. He lives with his family in Durham, North Carolina, and his writing has been featured in Amateur Astrophotography magazine, STEM Activities for Kids, and PetaPixel onlineWhy You Can Trust Our Reviews
At TelescopeGuide.org we're as passionate about astronomy as you are. As such, we take our recommendations seriously and would never recommend anything we wouldn't be willing to buy and use ourselves. When we consider our recommendations, we look at a wide variety of products from a range of manufacturers. We take into account the quality of the product, as well as its durability, ease-of-use, performance, and overall value for money.Whenever we can, we test the products ourselves or, if that's not possible, we consider the opinions and experiences of other astronomers. Lastly, we take all these criteria and make our decision by creating an objective score for each one. In this way, whatever your needs, requirements or budget, you can be sure you're getting the best possible advice before you make your buying decision.
Feature Image Credit: Brian Taylor / TelescopeGuide.org


