There’s nothing quite like camping out under the stars. By returning to nature, we can also return to the world that our ancestors knew. We can even bring some of the conveniences of modern times with us. For example, ancient astronomers didn’t have the luxury of exploring the universe with a telescope. You might think a telescope is too large to pack with your camping gear, but the Celestron Travel Scope 70 aims to prove you wrong. Does it succeed in making itself the essential camping accessory? Or is it excess baggage? Keep reading for our full review.
See also:
About the Celestron Travel Scope 70
Before we dive into the details, let’s set some realistic expectations. While you can pack a large Dobsonian into the trunk of your car, the chances are you’ll want something a little more practical. This is especially true if you want something you can also use during the day – and a large Dobsonian isn’t the best choice for that.
You’ll need something small, light, portable and easy to set-up and use. This is essentially what the Travel Scope aims to be. Keeping this in mind, let’s review the scope’s key specs:
- Type: Refractor
- Optics: Glass, fully coated
- Aperture: 70mm
- Focal Length: 400mm
- Focal Ratio: 5.7
- Minimum Useful Magnification: 10x
- Maximum Useful Magnification: 168x
- Limiting Stellar Magnitude: 11.7
- Resolution (Dawes): 1.66 arc seconds
- Supplied Eyepieces: 20mm (20x) and 10mm (40x)
- Telescope Weight: 1.5 pounds
- Total Weight: 3.3 pounds
The Travel Scope is available with apertures of 50mm, 60mm, 70mm and 80mm. Besides the aperture of the telescope, the only essential difference between them is in the focal length. The 50mm and 60mm models have a focal length of 360mm while the 70mm and 80mm have focal lengths of 400mm. You can gather more light and have greater magnification with the larger apertures.
The difference in weight is negligible – the total weight of the 50mm aperture is 2.2 pounds, while the 80mm weighs a total of 4.4 pounds. While this is twice as heavy as the 50mm, the total weight is so minimal that it won’t cause anyone any problems.
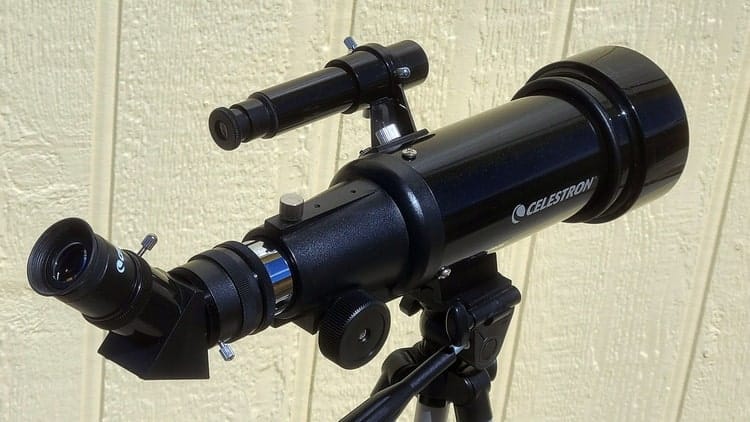
Image Credit: Richard Bartlett / TelescopeGuide.org
What’s Inside the Box
Besides the telescope itself, the kit also includes the following items:
- Altazimuth mount
- Tripod
- 45° erect image diagonal
- 5×24 finderscope
- Two eyepieces: 20mm (20x) and 10mm (40x)
- User manual
- Backpack
- Instructions on downloading the Starry Night Basic Edition software
- Info on the Sky Portal app
The altazimuth mount is pretty standard for small refractors such as these, while the tripod is a regular camera tripod. It’s not the most durable tripod, but you can easily replace it with one of your own choosing – which, as we’ll discover, is probably the best idea.
Whether you intend to use the scope during the day or exclusively at night, you’ll need the 45° erect image diagonal.
In an astronomical telescope, the image is always inverted – horizontally, vertically, or even both – and a diagonal is used to correct that. There’s a slight loss of image quality, but with a scope this size it’s not going to make a lot of difference.
Besides, you’ll find yourself using the diagonal simply because it’s impractical to use the telescope without it. The diagonal works by angling the eyepiece so that you’re looking down into the telescope tube, rather than directly through it. This saves you from having to contort yourself to look up through the telescope when it’s pointed at a high angle toward the sky.
Additional Accessories
This review covers the standard package for the Celestron Travel Scope 70, but there are other options available. For example, for a little more initial outlay, you could buy the package that includes the following additional accessories:
- Smartphone adapter – this allows you to attach almost any smartphone to the telescope and (potentially) capture images and video of targets. In practice, this is only really a viable option for the Moon, brighter deep-sky objects (such as the Orion Nebula) and anything you care to observe during the daytime.
- Lunar filter – an essential accessory for any telescope owner, a lunar filter is attached to an eyepiece and will significantly reduce the brightness of the Moon. Without it, the Moon can be dazzling and will ruin your night vision. It’s also worth knowing that the supplied filter is not the greatest, as it is tinted green and will discolor the Moon as a result. For a more natural-looking Moon, it’s worth investing in a neutral density lunar filter instead.
- 3x Barlow lens – another essential accessory, a Barlow lens will multiply the magnification of any eyepiece attached to it. The supplied 3x Barlow will increase the magnification threefold; as a result, the 20mm eyepiece will produce a magnification of 60x and the 10mm will produce a magnification of 120x. Every astronomer will own a Barlow as it effectively doubles the number of magnifications available to you; even though you might only have two eyepieces, you have access to four magnifications.
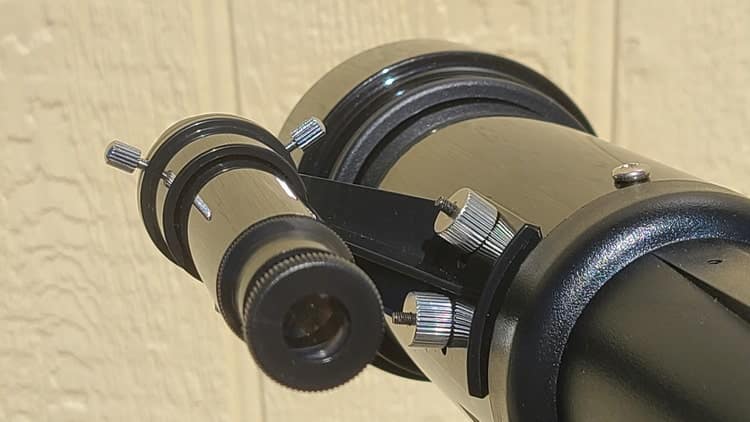
Image Credit: Richard Bartlett / TelescopeGuide.org
What We Liked
- Telescope itself is decent quality
- Very lightweight and portable
- Great for camping and hiking
- Easy to use
- Good for beginners
What We Didn’t Like
- Poor quality tripod
- Lackluster finderscope and eyepieces
- Backpack won’t provide much protection
- No accessory tray
Scorecard
| Category | Our Verdict | Why? |
|---|---|---|
| Skill Level | Beginner | For beginners of all ages |
| Quality | 4 out of 5 | Good optics, but let down by the accessories |
| Ease of Use | 4 out of 5 | Generally very easy, but needs a better finder and tripod |
| Power & Clarity | 3 out of 5 | Limited to about 100x in magnification |
| Control | 4 out of 5 | Generally very easy, but the tripod hampered |
| Portability | 5 out of 5 | Super light, ideal for camping and hiking |
| Accessories | 2 out of 5 | The eyepieces aren't terrible, but generally everything needs to be replaced |
| Overall Value | 4 out of 5 | Good for the price, but you'll need to pay more for decent accessories |
Celestron Travel Scope 70 Review – User Experience
Getting Set Up
Assembling the Travel Scope is pretty straightforward, and if you’re used to attaching a camera to a tripod you’ll probably have no trouble with this. For everyone else, the directions are pretty clear and there are ample illustrations and step-by-step instructions to help you along your way. Putting everything together doesn’t take long at all; attaching the scope to the tripod only takes a moment and then it’s just another couple of minutes to attach the finderscope, diagonal and eyepiece.
As mentioned earlier, the telescope is very light, even when attached to the tripod, and it’s very easy to simply pick everything up with just one hand and move it to the desired location.
However, before you turn the telescope toward its first target, you’ll need to align the finderscope. The process itself is simple enough in principle, but unfortunately, this is when you’ll encounter your first frustrations.
Aligning the Finderscope – A Foreshadowing of Things to Come
Attaching the finder itself is simple – you only need to slide it into the mount and then screw the mount onto the tube – and the process of alignment is theoretically easy. It’s best to do this during the day, so once the finder is attached, you should insert your lowest powered eyepiece into the diagonal (the 20mm that’s supplied with the scope will do the trick) and then point the scope towards a terrestrial target.
You’ll need to move the scope around until your target appears in the center of the eyepiece field of view. Here’s where things can get a little tricky, as you’ll need to adjust the finder so that your target appears at the center of the crosshairs too. One thing you’ll immediately notice is that the finderscope view is inverted, which makes targeting the telescope just that little bit more challenging.
You can lock the mount and prevent it from accidentally moving by tightening the appropriate screws and the vertical adjustment handle, but unfortunately, the process of tightening the screws causes the scope to move a little.
(You also have to resist the urge to hold the tripod steady as this will cause the scope to move. The problem, however, is that if you don’t, the entire tripod is likely to also move as it’s too lightweight and flimsy to stand steadily in one place.)
To be fair, many tripod-mounted scopes are prone to this type of issue, but it’s particularly noticeable with the Celestron Travel Scope 70.
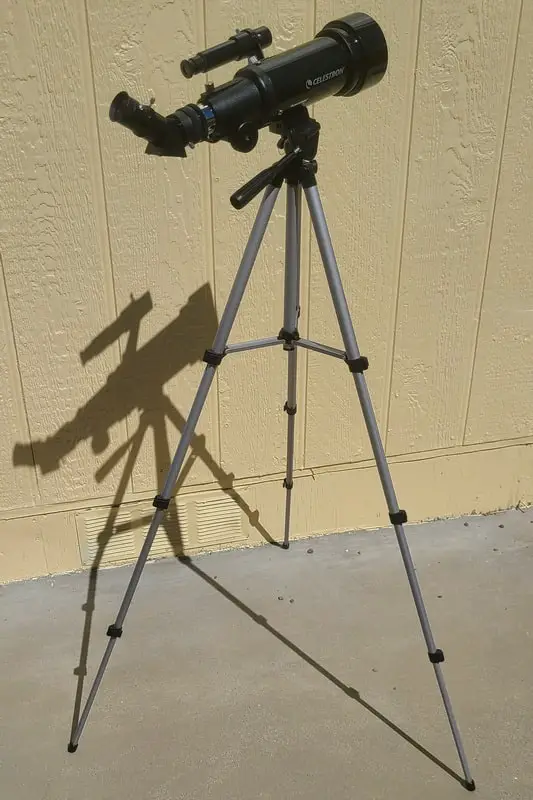
Image Credit: Richard Bartlett / TelescopeGuide.org
The Trouble With Tripods
Once the finder has been set up, you’re pretty much ready to go. Locating objects is straightforward, as the scope moves in a simple horizontal and vertical motion. You can use the tripod’s handle to accomplish this, and once you’ve found your target, you can then tighten it to keep the scope at the proper angle. This causes the telescope tube to sag a little, so you’ll need to allow for this play as you locate your target.
There are a few other things to keep in mind here:
- Don’t over-tighten the handle as you’ll need to move the scope from time to time. This is so you can keep track of your target as it crosses the sky. Also, be careful not to knock the scope as it’s easily moved out of position.
- Using heavier accessories may cause the eyepiece end of the telescope tube to sink toward the ground. You’ll then find your scope pointing up at a steep angle, rather than at your target!
- Observing targets at a high angle above the horizon is problematic. Pointing the telescope tube directly upwards can cause it to come into contact with one of the tripod legs. You can observe targets that are nearly overhead, but you’ll need to make sure the tripod legs aren’t obstructing the tube. (This is a common problem with all tripod-mounted scopes but you should still be aware of it.)
The focusing mechanism feels smooth, with only a little shake at a low magnification. Increase the magnification and the shaking becomes far more problematic. A lot of this is due to the tripod as its thin and flimsy legs aren’t capable of properly supporting the scope. Adjusting the screw on the focuser should make focusing a little easier and smoother.
Possible Solutions for the Tripod Problem
One solution for the lack of tripod stability might be to retract the legs and then place the telescope on a table. I didn’t try this myself, but it might offer some improvement. Otherwise, the best solution is to replace the tripod entirely with something a little sturdier.
The replacement tripod doesn’t have to be anything expensive either. I attached the Celestron Travel Scope 70 to a Victiv 72 inch tripod (See it on Amazon.com) and the entire experience was far more trouble-free and enjoyable. The general movement of the scope was smoother, the locking mechanism was more effective and the shakiness all but vanished. In short, replacing the tripod allows the telescope to perform exactly as it should.
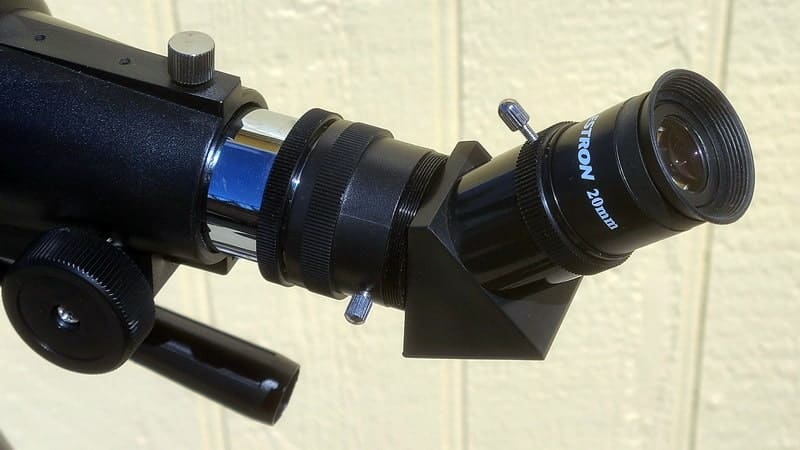
Image Credit: Richard Bartlett / TelescopeGuide.org
Bringing It All Into Focus
We tested the Celestron Travel Scope 70 during both the day and night. During the day the scope produced decent enough views; the 20mm eyepiece (20x) produced views that were up to the task, with little or no chromatic aberration around high contrast objects. The 10mm eyepiece (40x) didn’t fare quite as well, with some aberration around the edge of the field of view. It also had an uncomfortably narrow field of view.
Swapping the supplied eyepieces out for my own pre-purchased SVBONY eyepieces (an inexpensive and decent quality alternative) produced clearer, more comfortable views. This demonstrated that the optical faults lay with the supplied eyepieces, rather than the lenses of the scope itself.
The scope was tested on a moonless night (it was around last quarter) at a suburban location with above-average transparency and seeing. The limiting naked-eye magnitude was around 4.0.
Once you take the telescope out under the stars, you’ll soon notice the limitations of the finder. Despite (or because of?) it having a magnification of 5x and an aperture of 24mm, you’ll find it difficult to see anything but the brightest stars and planets through it. That being the case, you’ll probably need to star-hop to reach your celestial destination.
For example, although the Messier 41 open star cluster is easily visible in 7×35 binoculars, it was nowhere to be seen in the 5×24 finder. Arguably this is due to the reduced magnification and aperture, but it should be noted nonetheless.
Despite these limitations, the stars of the cluster appeared sharp and the telescope provided an attractive view, even at 20x. As you might expect, it was certainly better than the view through 10×50 or 20×50 binoculars.
The Sharpness of the Stars
The shape of the Orion Nebula (M42) was also detectable at 20x, with at least three of the Trapezium stars being seen. Doubling the magnification to 40x barely brought neighboring M43 into view while a hint of green was seen in M42 itself.
The Pleiades looked good, with the stars appearing sharp and blue. The better view comes with the 20mm eyepiece as the lower magnification (20x) produces a more aesthetically pleasing sight. Unfortunately, it’s not the same story with the Hyades, as the cluster is too large to fit within the field of view, but Aldebaran showed a strong coppery color.
Cor Caroli was an easy split at 20x, with the primary showing a nice, creamy peach color and the fainter secondary star appearing white. Mizar was a little more challenging; to me, it wasn’t a clear split at 20x but doubling the magnification to 40x certainly did the trick.
As mentioned earlier, it’s difficult to see anything but the brightest stars through the finder. With that in mind, the Beehive cluster proved to be too elusive. Fainter targets, such as globular clusters and galaxies, are similarly lost, even though I have no doubt the scope is capable of showing them.
Packing It All Away Again
Once you’ve finished for the night, it’s a good idea to pack the scope away in the provided backpack. For one thing, the entire assembly is so light that if it’s left standing it could be easily knocked over. Disassembly is easy enough: the eyepiece and diagonal slide easily out, the finder unscrews from the tube and the tube itself is then unscrewed from the tripod. Lastly, the tripod legs are retracted and folded up.
The backpack is of a pretty average size and weighs next to nothing. It’s a canvas bag with a zipped, shallow pocket on the inside of the cover and two more open pockets on the divider that separates the two main compartments. There’s plenty of room for the scope, tripod and a few vital accessories, but you’ll ultimately find it rather unsatisfactory.
The primary reason for this (besides the open pockets that can easily allow accessories to fall out) is that the two main compartments are too wide for either the scope or the tripod. More specifically, besides a very short divider and a couple of loose velcro straps that are too long to securely wrap around the hardware, there’s nothing to stop either the scope or the tripod from sliding around.
As such, again, it’s worth investing in a replacement backpack that’s better able to protect its contents. Again, like the replacement tripod, inexpensive alternatives are available that are more than up to the task – but be sure to buy one with dividers that can be customized to the scope and tripod.
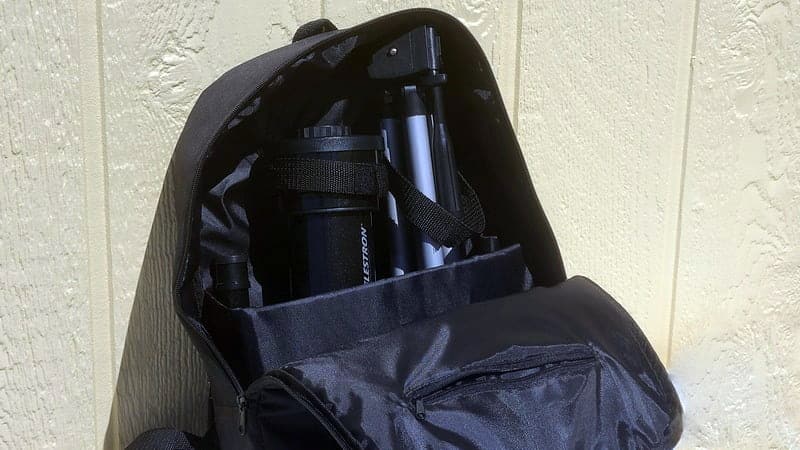
Image Credit: Richard Bartlett / TelescopeGuide.org
Final Thoughts on the Celestron Travel Scope 70
The Travel Scope produces very similar views to the FirstScope, but this really shouldn’t come as any surprise. After all, they’re both manufactured by Celestron and they both have a similar aperture and focal length. Unfortunately, they both suffer from the same problem: the scope itself is fine, but the accessories leave something to be desired.
In its favor, the Travel Scope comes supplied with a finder (whereas the FirstScope does not) and while the inverted view is confusing and it’s not the best quality, it will help you locate some of the brighter targets.
The eyepieces that are provided with the Celestron Travel Scope 70 are also a little better, but whereas the FirstScope has a solid Dobsonian mount, the Travel Scope is severely let down by its tripod. Personally, I wouldn’t trust the backpack to safely transport the telescope tube without a fair amount of extra padding.
In short, like the FirstScope, you’ll want to take the telescope tube and leave the accessories. At the very least, you should probably shop around for a good tripod and finder – it’s advisable to get some decent eyepieces too. For example, I’ve bought a number of the afore-mentioned SVBONY eyepieces for my scopes and they’re a good, inexpensive option for anyone just starting out.
Make these relatively minor upgrades and you’ll find yourself with a highly portable scope that’s worth camping out for.
(Also, if you liked this article, please share it using the social media buttons below!)About the Author
Richard J. Bartlett: Richard has been featured in Sky & Telescope and Astronomy magazine. He’s written and published a number of astronomy-related books, and we’re super happy to be able to work with him on Telescope Guide articles.Why You Can Trust Our Reviews
At TelescopeGuide.org we're as passionate about astronomy as you are. As such, we take our recommendations seriously and would never recommend anything we wouldn't be willing to buy and use ourselves. When we consider our recommendations, we look at a wide variety of products from a range of manufacturers. We take into account the quality of the product, as well as its durability, ease-of-use, performance, and overall value for money.Whenever we can, we test the products ourselves or, if that's not possible, we consider the opinions and experiences of other astronomers. Lastly, we take all these criteria and make our decision by creating an objective score for each one. In this way, whatever your needs, requirements or budget, you can be sure you're getting the best possible advice before you make your buying decision.
Feature Image Credit: Richard Bartlett / TelescopeGuide.org

