Looking for the best telescope under $300, and not sure where to start? You’ve come to the right place! In this guide, we’ll share with you our top picks for telescopes in this price range and below – whether you’re looking to buy your first telescope, or an experienced astronomer looking for an entry-level telescope for easy transportation or backyard viewing. If you have a little more or less to spend, be sure to check out our other guides as well.
See also:
It’s human nature to want to explore the cosmos. But if you’re new to astronomy, it can be overwhelming to consider all the options available. If you’re looking for the ultimate in affordability and practicality, with maximum specs on a budget, our #1 pick is a “Tabletop Dobsonian” design, which is a great choice for anyone who wants to learn their way around the sky. If you’re willing to put in a little more effort, our #2 pick below offers a lot of power and also provides an equatorial mount which makes it easy to keep your target centered in the eyepiece for an extended period of viewing. Keep reading below to discover our top picks for the best telescope under $300. As a bonus, below the telescope reviews you’ll find a buying guide and a FAQ section for more information.
(Before we begin, please note that product pricing, price categories and availability are accurate as of the date of this post, but are subject to change. This post represents the author’s opinion, based on research and experience, of the “best” or “top” telescopes in this category; the opinions of others may vary.)
Best Telescope Under $300
Orion StarBlast 4.5 Astro Tabletop Reflector Telescope
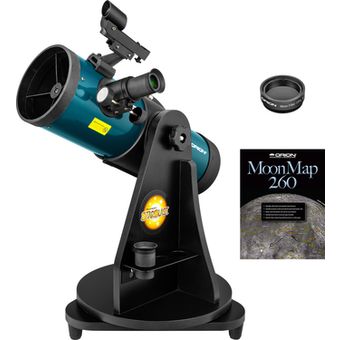
Image Credit: Orion (Used with Permission)
Super easy-to-use telescope, fits on a tabletop – great for kids and beginners! The Orion StarBlast is widely recommended as one of the best overall telescopes for getting started with astronomy. It’s drop-dead simple to use, highly portable, and overall a fantastic choice for a first telescope.
Scorecard – Orion StarBlast 4.5 Astro Tabletop
| Category | Our Verdict | Why? |
|---|---|---|
| Skill Level | Beginner | Suitable for beginners |
| Quality | 4 out of 5 | Great component quality |
| Ease of Use | 4 out of 5 | Easy to use tabletop design; requires collimation |
| Power & Clarity | 3 out of 5 | Bright images but not for high magnification |
| Control | 3 out of 5 | Tabletop AZ mount |
| Portability | 4 out of 5 | Super compact and easy to setup, weighs 13 lbs. |
| Accessories | 3 out of 5 | Everything needed to get started |
| Overall Value | 4 out of 5 | Great value |
Why We Like It
The Orion StarBlast 4.5 offers the power of a 4.5″ (114mm) wide aperture combined with a super user-friendly design. It’s mounted on a tabletop alt-azimuth base that’s stable and makes it easy to manually find and track objects in the sky. The small, highly-portable design makes astronomy accessible and convenient for anyone getting started.
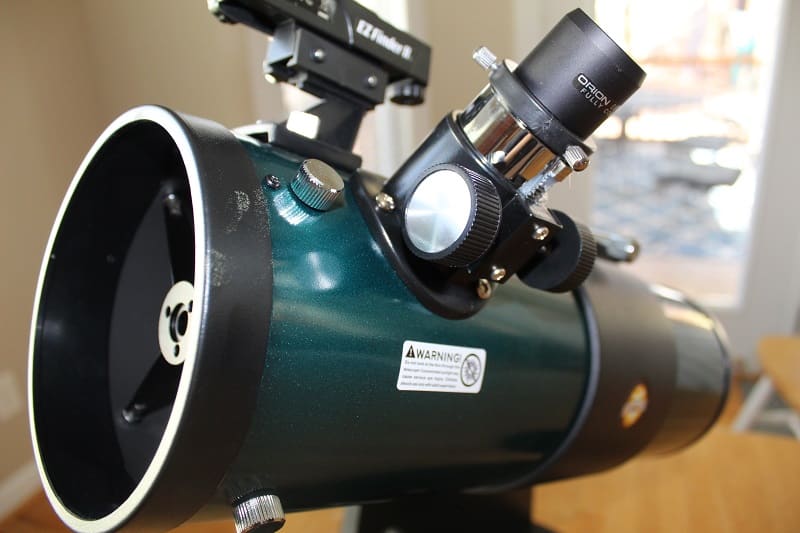
Image Credit: Brian Taylor / TelescopeGuide.org
The optics are bright and clear, with a short focal length (450mm) for a wide field of view. (And that’s a great setup for beginners, for whom high magnification and fine precision are not required.) With its included 1.25 inch Kellner eyepieces (17mm and 6mm), magnification is 26x and 75x respectively. Also included: an EZ Finder II reflex sight for easy aiming, built-in eyepiece rack, collimation cap, and more. (Plus, includes Orion’s Starry Night astronomy software.)
Pros
- Stable tabletop base (alt-azimuth) is easy for kids and beginners
- Ships pre-assembled – super easy to setup
- Compact and highly portable
Cons
- Warranty is 1 year vs. Celestron’s 2 years
- Not for high magnification viewing
Orion StarBlast II 4.5 Equatorial Reflector Telescope
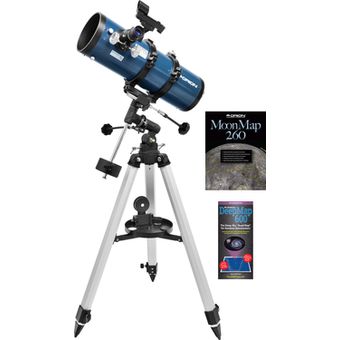
Image Credit: Orion (Used with Permission)
Easy-to-use reflector for beginners, plus an EQ mount. The Orion StarBlast II 4.5 takes a different approach for beginners compared to many of the other best telescopes under $300. It’s a classical Newtonian Reflector but it has a much shorter focal length. This design favors lower levels of magnification for the beginner. Combined with its high-quality Sirius Plossl eyepieces and equatorial controls, the net result is a telescope that’s easy to use, easy to control, easy to find objects in the sky, and offers bright and clear images.
Scorecard – Orion StarBlast II 4.5
| Category | Our Verdict | Why? |
|---|---|---|
| Skill Level | Beginner | Suitable for beginners |
| Quality | 4 out of 5 | Great component quality |
| Ease of Use | 4 out of 5 | Requires collimation but not as difficult as Bird-Jones design reflectors |
| Power & Clarity | 3 out of 5 | Bright images but not for high magnification |
| Control | 4 out of 5 | Smooth EQ controls |
| Portability | 3 out of 5 | Compact but heavy |
| Accessories | 4 out of 5 | Everything needed plus two Sirius Plossl eyepieces |
| Overall Value | 4 out of 5 | Great value |
Why We Like It
If you’re looking for a starter telescope that’s super easy to use, but also offers bright & clear images, this short-focal-length reflector is a great option. We like Orion’s choice to stay true to the Newtonian design while also making the telescope compact. With a 114 mm (4.5 inch) aperture and a 450 mm focal length, a true parabolic mirror (unlike the Bird-Jones), and two high-quality Sirius Plossl eyepieces (25mm and 10mm), the telescope offers magnification from 18x to 45x by default. That’s a fine starting point for beginners, and if you want higher magnification you can always add your own eyepieces under 10mm.
Pros
- Higher quality eyepieces than typical for budget telescopes
- Everything you need to get started, including adjustable-height tripod, EZ Finder II reflex sight, and more
- Wide aperture for bright and clear images
Cons
- Warranty is 1 year vs. Celestron’s 2 years
- Somewhat heavy at 20.7 lbs. fully assembled
- As with most of the telescopes in this category, don’t expect to be wowed by the tripod and mount quality
Gskyer 80mm Astronomical Refractor Telescope
Easy-to-use 80mm refractor with smartphone mount. If you’re looking for a super easy-to-use telescope with a great starter package of accessories, this Gskyer 80mm could be for you. It includes a smartphone mount, a remote control for pictures, 3 eyepieces, a 3x barlow lens, and more.
Scorecard – Gskyer 80mm Astronomical Refractor Telescope
| Category | Our Verdict | Why? |
|---|---|---|
| Skill Level | Beginner | Suitable for beginners |
| Quality | 3 out of 5 | Heavy main tube; entry-level components |
| Ease of Use | 4 out of 5 | Easy to setup and use |
| Power & Clarity | 3 out of 5 | Average optical performance |
| Control | 3 out of 5 | Average, AZ mount |
| Portability | 4 out of 5 | Easy to bring with you into the field |
| Accessories | 4 out of 5 | Wide selection of accessories included |
| Overall Value | 4 out of 5 | Great value |
Why We Like It
The best thing here is the variety of entry-level accessories and the focus on ease-of-use. It’s a refractor with a decent 80mm lens (glass with high-transmission coatings). It has a super short focal distance of 400mm which gives it a wide field of view – ideal for learning and navigating the sky. You can magnify images 16x, 40x, and 80x using the three included eyepieces.
It comes with a great selection of entry-level accessories, including three eyepieces (25mm, 10mm, 5mm), one 3x Barlow lens, a positive-image finder scope, and a 48° erecting prism. (Images will be right side up for easy and intuitive viewing.) It also includes a smartphone mount, a remote control (for snapping pictures on your phone), and an adjustable stainless steel tripod. No tools required.
Like its sibling the 600×90, the quality of this Gskyer is decent (metal main tube, solid stainless steel tripod). However, you do need to keep in mind this is not a high-end telescope – it’s an entry-level package for getting started.
Pros
- Easy to use and setup
- Includes everything you need to get started
- Smartphone mount and remote control
- Stainless steel tripod
Cons
- Only 1 year limited warranty
- Don’t expect too much from the 3x Barlow lens – it’s plastic (plus, with an 80mm aperture, magnification will be limited)
- Single handle for tightening the alt-az mount along both axes
Honorable Mention – If Your Budget is More Flexible
Celestron AstroMaster 114EQ Manual Equatorial Reflector Telescope
Great quality reflector telescope, but not for true beginners. The AstroMaster 114EQ by Celestron is marketed as a Newtonian telescope, but it’s actually a Bird-Jones which has some subtle differences. The mirror is spherical vs. parabolic, which allows it to be smaller than a classic Newtonian. It’s a decent choice if you’re looking for a more compact, portable reflector with good magnification and precise movement control.
Scorecard – Celestron Astromaster 114EQ
| Category | Our Verdict | Why? |
|---|---|---|
| Skill Level | Intermediate | Not for true beginners |
| Quality | 4 out of 5 | Great component quality |
| Ease of Use | 3 out of 5 | Collimation requires skill |
| Power & Clarity | 3 out of 5 | Average |
| Control | 4 out of 5 | Smooth EQ controls |
| Portability | 4 out of 5 | Compact and easy to move |
| Accessories | 3 out of 5 | Everything needed plus two eyepieces |
| Overall Value | 4 out of 5 | Great value |
Why We Like It
The 114EQ weighs in at 17 lbs., featuring a sturdy and light-weight frame. Additionally, it comes with all the required accessories including two eyepieces (20mm and 10mm), an adjustable tripod, and a Starpoint red dot finderscope. It’s a professionally designed, high-quality telescope, easy to assemble, and suitable for kids and adults getting started with telescopes. (Plus, it comes with free bonus software which is a great way for kids to learn about the nighttime sky.)
The Manual German Equatorial mount has two knobs that make it easy to track objects as the earth rotates slowly, making it easy to keep your target centered in the eyepiece. The high-quality optics are fully-coated glass, with magnification ranging from 50x to 100x.
As with all reflectors, collimation is a requirement for good viewing – and this one is no different. Plus, the Bird-Jones design is a bit more difficult to collimate compared to a simpler Newtonian. So, make sure you’re willing to put in the time it takes to learn this procedure.
If you’re trying to decide between the Astromaster 114EQ and the PowerSeeker 114EQ, it comes down to component quality, size, and ease of collimation. (The Astromaster 114EQ is higher quality and more compact, but harder to collimate. The PowerSeeker 114EQ is easier to collimate, but the trade-off is size and slightly lower component quality.)
Pros
- Compact and portable
- Smooth equatorial controls
- Requires little maintenance
- Comes with all needed accessories
Cons
- Collimation can be challenging
- Some users have complained about rusty counterweights
- Short battery life for the finder scope
Buying Guide For The Best Telescope Under $300
Choosing a telescope can be confusing. There are many different designs, features, and options to consider. Below, we’ll share with you our basic thoughts on choosing a telescope in this price category, and some of the considerations to help you navigate the decision.
Basic Telescope Types
The most basic decision you’ll make is what kind of telescope to buy. In very general terms, there are two major categories of telescopes on the market:
- Refracting telescopes – This is the most basic design. It uses a glass lens as its primary method of gathering and focusing light. When you combine the lens with an eyepiece, you are able to magnify the image for better viewing. Because refractors don’t utilize mirrors in the primary optical path (unless you’re using a diagonal to improve the viewing angle) – they are typically about the same length as their focal distance. (That’s why they usually look long and narrow.)
- Reflecting telescopes – Reflectors use mirrors instead of a lens to gather and focus light. The light enters through a wide opening, and then a mirror redirects the light back towards the opening before it’s redirected to the eyepiece using another mirror. Because of the use of mirrors (vs. a lens), reflectors are less expensive to manufacture (for same-size aperture) and are also more compact due to the redirection of light within the tube. (Note: There are quite a few sub-types of reflectors – however, we’ll focus in this article on the simplest type, the Newtonian reflector design.)
(Note: There are many variations on reflecting telescopes, including various kinds of compound/catadioptric telescopes. However, you typically won’t find these under $300.)
Refracting vs. Reflecting Telescopes
Each of the major types of telescope has advantages and disadvantages. Very broadly, here is a quick comparison:
- Cost – You’ll typically find a good-quality refractor costs more (for similar aperture size) than a reflector. Mirrors are cheaper to manufacture. (And the cost can increase even further for higher quality refracting lenses – e.g. a doublet or triplet “apochromatic” lens costs a lot more than a more typical “achromatic” lens.) So, if you are looking to maximize value, you might prefer a reflecting telescope.
- Size – All things being equal, reflectors are smaller than refractors due to the folding of light using the mirror system employed by reflecting telescopes.
- Maintenance – Reflectors require a process call “collimation” because the mirrors need to be aligned for proper performance. A poorly collimated reflector will appear blurry and will be difficult to focus. Refractors tend to have fixed lenses, so they don’t usually need adjustment.
- Optical performance – In general terms, a high-quality refractor produces the sharpest and clearest images. (For example, astrophotographers love to use high-end APO refractors.) However, a lower quality refracting lens introduces the possibility of chromatic aberration (where different colors focus differently, causing distortion and blurring). Reflectors are not subject to this chromatic aberration – so, if you’re on a budget, reflectors are often the better choice for optical clarity if you’re looking to maximize the size of aperture.
- Ease of use – You can’t beat the simplicity of a refracting telescope. If you’re looking for a traveling telescope that sets up in minutes, you’ll want to get a refractor. However, unless you have a large budget, you’ll get better viewing of the cosmos with a large-aperture reflector.
Aperture – Bigger is Better
Most people believe that a telescope’s main job is magnification. However, that’s not true! A telescope’s primary role is to gather light. And, the size of the aperture – i.e. the primary light-gathering opening (the objective lens on a refractor, or the primary mirror on a reflector) – determines how much light can be gathered at a particular time.
When choosing a first telescope, you should really avoid anything with an aperture smaller than 70mm. In general, the larger the aperture, the more powerful the telescope. A larger aperture allows for brighter images.
Also, a larger aperture can make it possible to achieve higher magnification. Have you ever tried to zoom in on a low-resolution image? It appears grainy and blurry. It’s the same with a telescope – you can typically magnify images more with a larger aperture. Since you’re collecting more light, you can zoom in a little more with your eyepiece without sacrificing as much image quality.
Choosing a Mount
There are basically two types of mounting systems for telescopes. Here’s a very basic summary:
1. Alt-Azimuth Mounts
The first type of mount is the Alt-Az or Alt-Azimuth. It moves along two axes w/ vertical and horizontal motions. (If you want to get technical, the two axes of rotation are the horizontal direction, i.e. the “Azimuth” or compass bearing, and the vertical direction, i.e. the “Altitude” or “Alt” for short.) This is the simplest and easiest-to-use mount for beginners because it works the way you would expect, similar to a camera tripod. To use it, you simply point it where you want to look and tighten it down. Some models come with knobs for slow motion so you can make finer adjustments.
2. Equatorial Mounts
The other major type of telescope mount is the “equatorial” which is a special type of mount designed specifically for tracking astronomical objects as the earth rotates. (When you use any telescope mount, your target will continuously drift away from the center of your eyepiece; an equatorial mount is designed to make it easy for you to keep it in the center.) An equatorial mount is harder for beginners to use because it takes some time to learn how to properly align, and it’s less intuitive initially to find objects with it. However, once it is properly aligned, you can track objects in the sky using slow-motion control along a single axis (whereas the Alt-Az requires continuous movement of both axes). An equatorial mount has two axes of movement – (a) along the equatorial axis (this is called right ascension), and (b) along the perpendicular axis (known as declination).
Computerized Mounts
Both Alt-Az and Equatorial mounts can be motorized or even computerized, allowing a computer system to automatically control the direction and tracking of the telescope. Some of the computerized mounts (known as “Go To” mounts) include large databases of astronomical objects, automating the task of finding things in the sky.
Dobsonian Telescopes
Finally – there is one special type of Alt-Az mount deserving a special mention – and that is the Dobsonian telescope design. This particular telescope design is widely recommended as the best option for the average amateur astronomer, because it provides a special blend of affordability with ease-of-use and power using a unique design variation of the Alt-Az mount combined with a large Newtonian reflector telescope. Check out our entire guide to Dobsonian telescopes here.
Eyepieces
An ocular lens or eyepiece is the part of a telescope that you look through while using it.
The focal length of the eyepiece is what determines you magnification level. (To calculate this, you simply divide the focal distance of your telescope by the focal length of the eyepiece. For example, a 1000mm telescope with a 10mm eyepiece will yield a magnification of 100x.) The eyepiece locates before the focal point and helps you to magnify the view coming through.
There are many different types and sizes of eyepieces. When you’re getting started with a first telescope, it’s good to have a few different eyepiece combinations (plus a Barlow lens which can provide higher magnification when coupled with any eyepiece). This will give you more flexibility to try viewing different objects at various levels of magnification.
Frequently Asked Questions (FAQ) for Best Telescope Under $300
What Can I View With A Telescope?
It really depends on a number of factors – including your location, time of year, type of telescope, cloud conditions, fullness of the moon, and the degree of light pollution in your area.
For optimal viewing of deep space objects, distant galaxies, nebulae, and start clusters – choose a dark sky location and check the sky conditions beforehand.
With that said – anyone with a telescope should be able to see bright objects in typical backyard viewing. This includes (of course) the moon, but also planets like Mars, Jupiter, and Saturn. Under the right conditions you should also be able to see details including craters on the moon, the rings around Saturn, and the moons of Jupiter.
How Do I Find Objects Using My Telescope?
At first, you have to practice looking at terrestrial objects like houses, trees, etc. The first object in the sky for most people is the moon, followed by the planets of the solar system. Eventually you’ll learn how to “star hop” by finding major constellations first and then moving slowly to your target. It also helps to get familiar with the sky using astronomy software – many telescopes include free software for learning how to navigate the skies. With enough practice, you’ll learn your way around and be able to quickly find major targets on your own.
How Do I Properly Focus A Telescope?
First, make sure your finder scope is properly aligned with the main tube of the telescope. Next, locate your target using the finder scope, and then look into the main eyepiece to see the object. Then, fine-tune your focus with the telescope’s focuser. You’ll be able to see the target object clearly after adjusting.
Can I Take Photographs Through My Telescope?
Yes! Many telescopes can be used with a smartphone mount (with the purchase of an additional accessory) and some can even support a DSLR or dedicated astronomy camera. If you want to capture an image of any bright object (e.g. the moon), this is all you’ll need. However, if you want to image more distant or faint objects (e.g. nebulae or distant galaxies), you’ll need a more sophisticated setup including a computerized equatorial mount for astrophotography and appropriate software for stacking images.
Conclusion – Best Telescope Under $300
It’s possible to buy a fantastic telescope in this price category – as long as you understand what you’re looking for. We hope our buying guide above is helpful to you, along with our recommendations for best telescope under 300 dollars. Now, it’s your turn to choose one and get started viewing!
(Also, if you liked this article, please share it using the social media buttons below!)
Feature Image Credit: Thirdman / Pexels


