Astrophotography is a rewarding (and addictive) way to enjoy the beauty of the cosmos. But it can also be a complicated and cost-prohibitive hobby – especially if you want to try imaging some of the more challenging targets in deep space. With Remote Astrophotography, you can create stunning images for a fraction of the cost, using world-class remote astronomy telescopes situated in prime locations around the world. These telescopes, housed in remote-controlled observatories, provide a great way to get started without spending a fortune. Even if you have your own gear, remote astrophotography can help you hone your processing skills, minimize light pollution, try out higher-end equipment, and capture images from a different hemisphere. Keep reading to learn how to get started.
See also:
Why Consider Doing Astrophotography with a Remote Astronomy Telescope?
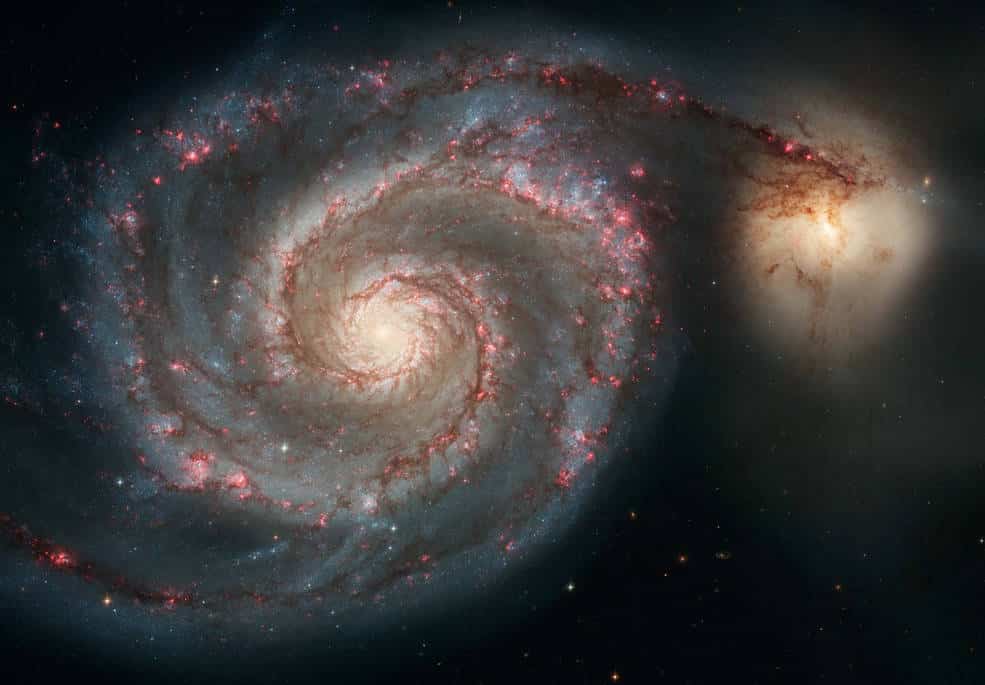
Messier 51 (The Whirlpool Galaxy); Image Credit: NASA, ESA, S. Beckwith (STScI) and the Hubble Heritage Team (STScI/AURA)
There’s something uniquely satisfying about using your own equipment and software (plus some patience and skill) to capture a stunning image of a galaxy or nebula in deep space. However, as amazing as it feels to do astrophotography on your own, it’s also a hobby that can get … well … expensive.
First, the best astrophotography shots require a high-end apochromatic refractor telescope, or a fine-tuned astrograph reflector with precision-built optics. Second, in addition to the telescope for astrophotography itself, you’ll need a smooth computerized mount capable of being auto-guided with the help of a secondary guide scope. Third, you’ll need a suitable camera and several other accessories. (For example, a dew control system, filters, reducers, field flatteners, correctors, etc.)
Finally, you’ll need a place to set up your equipment. While you can certainly do astrophotography in your backyard, it takes time and effort each time you want to set everything up. And you may need to contend with light pollution or sky conditions, which can make things more challenging.
Also, one last thing: Even if you have excellent equipment and a great place for imaging, your particular combination of equipment, location, and hemisphere will always limit what you can capture.
So, regardless of your situation, having remote telescopes in your astrophotography toolkit can help expand the imaging options available to you.
What is Remote Astrophotography and How Does it Work?
With remote astrophotography, you collect your image data using a telescope set up in a remote location.
An observatory, usually located in a dark-sky location (whether an official IDA site or just a remote location with a very dark sky), houses the remote astronomy telescope. The observatory allows remote, electronic control of its roof, so you can remove it anytime for telescope operation without anyone physically onsite at the observatory.
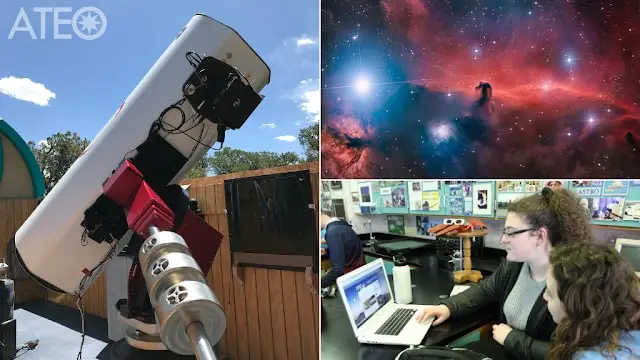
Insight Observatory’s ATEO-1 Remote Telescope with Image of The Horsehead Nebula; Image Credit: Insight Observatory
Here’s how it works:
- First, you submit an image request to the observatory operator, specifying your target and any other details required for collecting the image data.
- Next, the remote telescope collects the requested exposures and sends you a file containing the raw (unprocessed) image data.
- Finally, you use your own image processing software to “stack” and process your images to produce the final result.
Advantages of Using a Remote Astrophotography Telescope
This approach to astrophotography has some key advantages vs. traditional astrophotography where you own & operate your own equipment:
- Cost – Most people can’t (or won’t) pay tens of thousands of dollars for higher-end astrophotography equipment. With remote telescopes for astrophotography, you can access some amazing gear and capture world-class images – all for a fraction of the cost of purchasing the equipment yourself.
- Conditions – Because the telescope is remotely controlled, the owner can set it up permanently in a place with less light pollution and more frequently favorable sky conditions – resulting in a more consistently wonderful view of the sky.
- Flexibility – With access to a variety of types & sizes of imaging telescopes, along with a variety of locations, you have more flexibility to get the perfect image of whatever celestial target you want to capture.
- Time – The telescopes remain ready to go at a moment’s notice (because they are in permanent locations), which saves you some time compared with setting up your own equipment.
It’s a Good Way for Beginners to Get Started
For beginners, remote astrophotography offers a great way to get started and learn some of the basics of imaging objects in deep space. You can focus your energy and initial learning on understanding the overall process, figuring out the optimal exposure settings, and converting the raw data into beautiful final images.
Sometimes people learning astrophotography spend a lot of time and money on equipment and capturing raw images, but they don’t spend as much time learning and perfecting the back-end of the process where the image “comes to life”. With remote astrophotography, you can learn the entire process before investing in equipment. (Or, you can do a mixture – use your own equipment while also experimenting with remote astronomy telescopes so you can compare and optimize results.)
It’s Also Great for Experienced Astrophotographers, Teachers, and Students
If you’re a more experienced astrophotographer, you can still take advantage of the benefits of using remote telescopes for astrophotography:
- Practice & refine your processing skills with a wider variety of targets, conditions, and equipment.
- Use higher-end equipment when you want to create an especially spectacular image.
- Capture images from a different location / hemisphere.
- If you’re crunched for time, take images without setting up the equipment.
- If you have poor local sky/weather conditions – take images anytime by choosing a location with better conditions. (You’re no longer limited to imaging only when local conditions are good.)
For teachers and students, remote astronomy telescope images can also provide a fantastic supplemental resource to your educational curriculum or your physics/astronomy/space research projects.
How to Get Started: Online Options for Remote Astrophotography Telescopes
1. Insight Observatory’s ATEO Remote Telescope Portal
Our favorite option for remote astrophotography is Insight Observatory, based out of Cape Cod, MA (US). They operate a high-end network of remote astrophotography telescopes located around the world, including the United States, Chile, Spain, and Southern Africa.
They call their remote astronomy telescope program “ATEO,” which stands for Astronomical Telescopes for Educational Outreach.
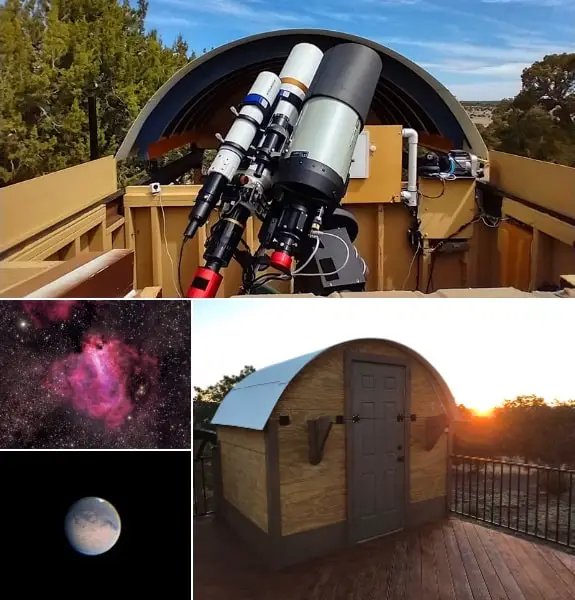
Insight Observatory’s ATEO-2A and ATEO-2B Remote Telescopes with Images of M17 (The Omega Nebula) and Mars; Image Credit: Insight Observatory
One of the best features of Insight Observatory is their online user portal, which makes it super easy to use. (Keep reading for a step-by-step guide to using it.)
If you’re a beginner and not sure exactly what kind of exposure settings are needed to collect data for a particular target, the ATEO Portal offers a “Basic Image Request” feature where they will take care of the detailed settings for you. (You only need to choose which telescope you want to use, select your target, and specify total exposure time. Then they’ll take care of the rest.)
For more advanced users, you can specify the exposure details you want with an “Advanced Image Request”. (This allows you to request a specific number of images, exposure length, binning mode, and filters.)
Remote Astronomy Telescopes Available through Insight Observatory’s ATEO Portal
We’ve set out a quick summary of the telescopes available with the ATEO Portal below. You can see them and read more about them here.
- ATEO-1: New Mexico, US – 16” f/3.7 Astrograph Reflector
- ATEO-2A: New Mexico, US – 5” f/5.8 Williams Optics APO Refractor
- ATEO-2B: New Mexico, US – 8” f/10 Edge HD Schmidt-Cassegrain
- ATEO-3: Rio Hurtado Valley, Chile – 12.5” f/9 Quasar Ritchey-Chretien
- AFIL-3: Namibia, Southern Africa – 20” f/6.7 Dall-Kirkham
- AFIL-5: Namibia, Southern Africa – 200mm f/3 Veloce AT
- AFIL-6: Nerpio, Spain – 200mm f/3 Veloce AT
Options for Telescope Access
Insight Observatory offers the following ways to access their remote telescopes, plus some additional options to leverage data and images in their database:
- ATEO Portal – A user-friendly web portal for accessing the various remote astronomy telescopes available around the world. (See our walk-through below, using the ATEO Portal.)
- Starbase Subscription – Starbase provides a repository of image data captured by the ATEO network of remote telescopes, organized by the image target into image “sets”. They’ve made these image sets available for purchase (referred to as “subscribing” to the image set) and download.
- Personal Image Request (PIR) – If you would like to start with a “primer” (just a single image to try out the service), you can request one without creating a portal account.
- Educational Image Request (EIR) – For teachers and students in a classroom environment (K-12), and public venues like public libraries.
- Interstellar Prints – They recently launched a new website (https://www.interstellarprint.com/) offering high-quality prints and digital downloads of objects processed from data on the ATEO remote telescope network. Mike Petrasko, co-founder of Insight Observatory, tells the background on this: “We started having people ask for prints of some of our images. One of our clients owns a print shop in Taos, New Mexico (a big artist community). He scans and prints high-end prints of artist’s paintings, drawings, etc. so the artists can sell the exact replicas of their work online or in their own galleries. They have around 60k invested in this equipment. He sent one up to us and it was amazing. It was like looking at an image of a deep sky object on a computer screen on paper.”
2. iTelescope
iTelescope (https://www.itelescope.net/) operates five remote observatories around the world (in Australia, New Mexico US, California US, Spain, and Chile) – with a good selection of telescopes ranging from 106mm APO refractors up to a 610mm reflector. They also allow expert control of the astrophotography exposure and telescope settings, and an online “Launchpad” for managing your remote imaging sessions.
3. Schulman 32″ Telescope (University of Arizona)
For advanced users, you can purchase astrophotography time and take full control of this huge reflector telescope housed in the observatory atop Mount Lemmon’s 9,170-foot peak. https://skycenter.arizona.edu/remote-astrophotography/
4. Other Options
- Telescope Live: https://telescope.live/ – Online access to a global network of 10 robotic telescopes.
- Slooh: https://www.slooh.com/ – An active online astronomy community, with a heavy educational component. You can schedule time on their telescopes for live viewing or astrophotography.
Step By Step Guide: A Walk-Through Using Insight Observatory’s ATEO-1 Remote Telescope for Astrophotography
If you would like to give remote astrophotography a try for yourself, it’s easy to create an account, request your first image exposures, and get started processing the data. Below is a step-by-step tutorial for a basic image request w/ Insight Observatory’s ATEO-1 remote telescope.
(For our tutorial, we’ll be imaging the “Whirlpool Galaxy” – NGC 5194, also known as Messier 51. At the top of this article we’ve included a beautiful image of the Whirlpool Galaxy from NASA. NASA’s description: “The graceful, winding arms of the majestic spiral galaxy M51 appear like a grand spiral staircase sweeping through space. They are actually long lanes of stars and gas laced with dust. Such striking arms are a hallmark of so-called grand-design spiral galaxies. In M51, also known as the Whirlpool galaxy, these arms serve an important purpose: they are star-formation factories, compressing hydrogen gas and creating clusters of new stars.”)
1. Sign up for the ATEO Portal
Go to Insight Observatory’s “ATEO Portal” here: https://ateodev.insightobs.com/ and complete the steps below to register and activate your account.
First, create an account by entering your email address and a password for the portal:
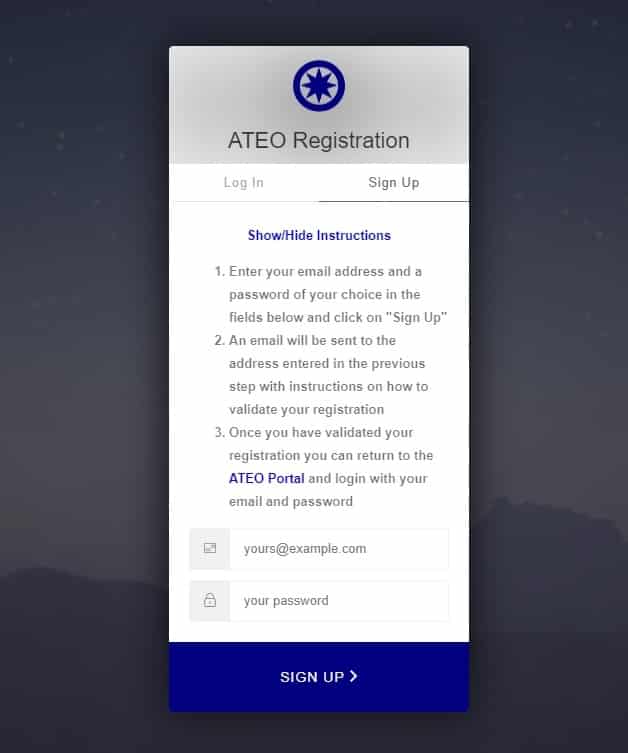
Above: Sign Up for ATEO Portal
Next, you’ll get an automatic email. Click the link in the email, then enter your information and click “Activate Account”.
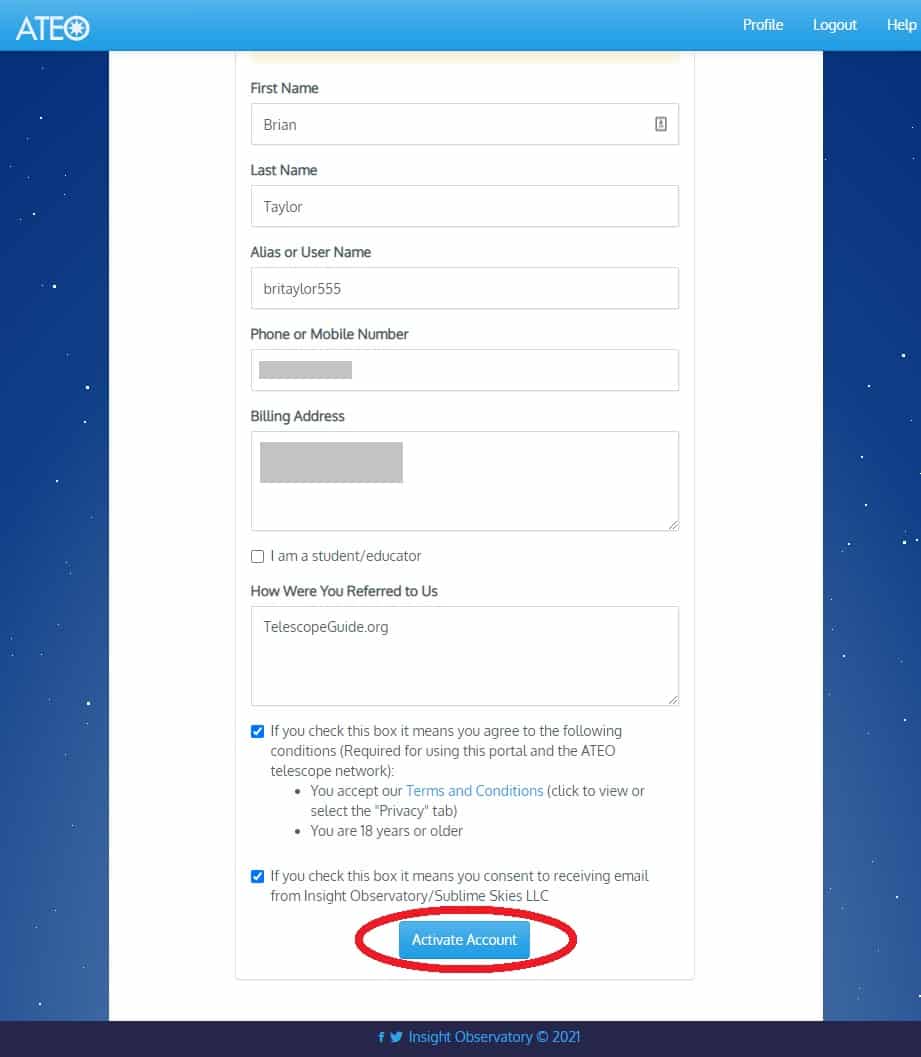
Above: Enter Your Information & Activate Account
That’s it. You can now explore the portal and begin requesting image data.
2. Request your image data
To request an image, go to the “Dashboard” in the ATEO Portal.

Above: Go to the Dashboard to Start Your Image Request
From here, you can enter a “Basic Image Request”. Simply select your telescope, find your target, and specify the total exposure time. (For more advanced users, you can enter an “Advanced Image Request” which allows you to specify more detailed settings for the exposures to be collected.)
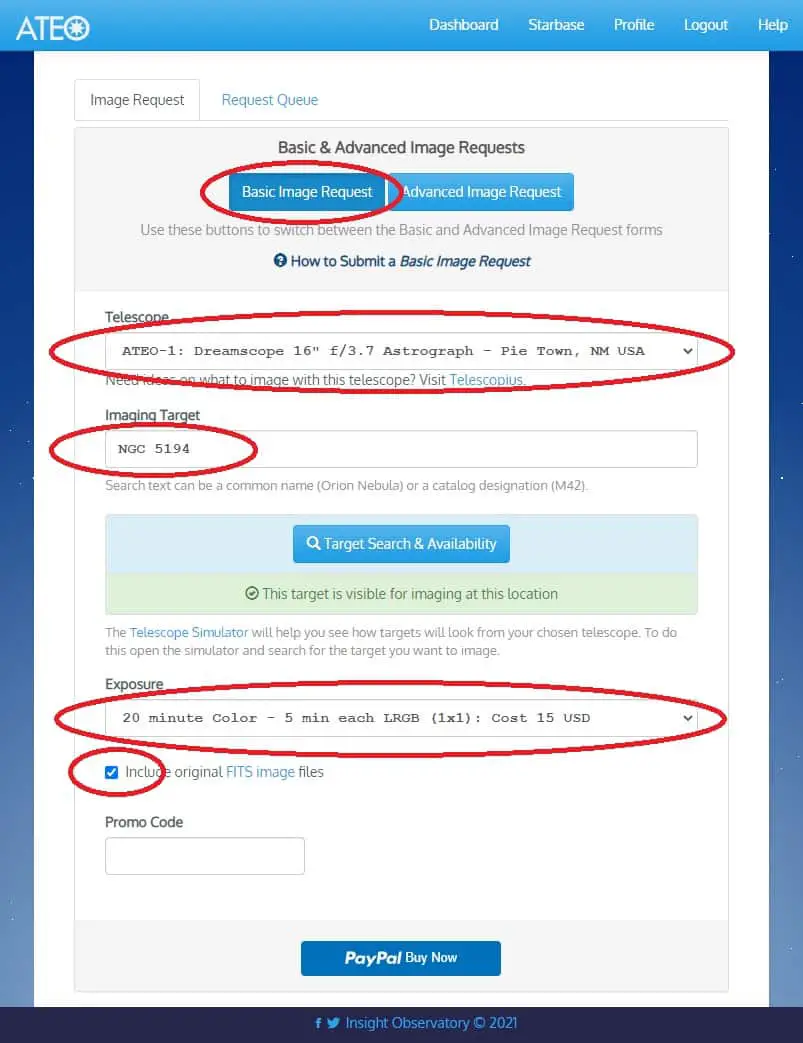
Above: Entering a “Basic Image Request”
The remote telescope will then collect your exposures at the next available opportunity. This can take up to a few days depending on sky conditions and telescope availability. (Note: You don’t need to worry too much about weather and timing of your request. Insight Observatory offers a quality control process to ensure you will get good image data. If conditions are bad for imaging, they will hold your request until conditions improve.)
3. Receive the raw image data (FITS format)
As you’re getting started with astrophotography, it’s important to understand the FITS data format.
According to nasa.gov: FITS (Flexible Image Transport System) is the data format most widely used within astronomy for transporting, analyzing, and archiving scientific data files. FITS is much more than just another image format (such as JPG or GIF) and is primarily designed to store scientific data sets consisting of multidimensional arrays (images) and 2-dimensional tables organized into rows and columns of information. (For more information, check out NASA’s primer on the FITS file format.)
Email Notification
Once the remote telescope has collected your data, Insight Observatory staff will manually do a quality check before sending it to you. Then you’ll receive an email notification with a link to the ATEO Portal for your files ready to download.
Here’s what the email looks like. I’ve circled the 2 links you need to click on to download your data files as well as the calibration files (darks and flats) which will be needed for processing.
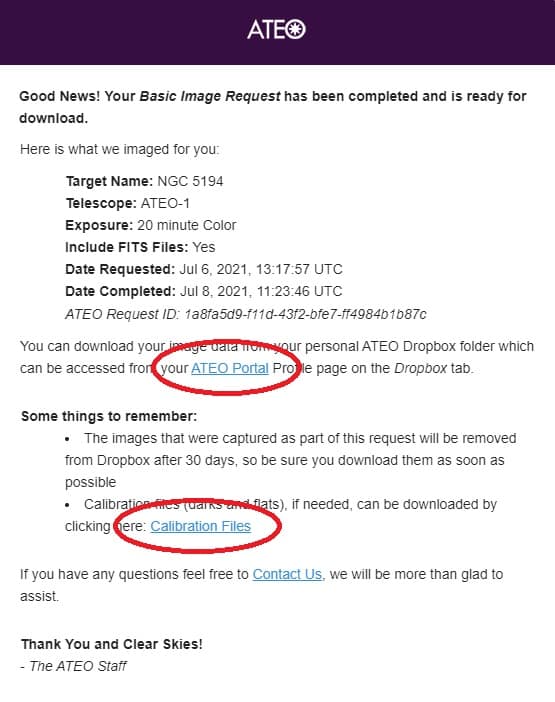
Above: Email Notification When Your Image Request is Complete
Download Image Files
To download your files, click the link in the email to go to the ATEO Portal, and login to the portal. Go to your “Profile” and then “Dropbox”. Click the Dropbox link to view and download your files. (Note: If you’re concerned about security, you can also click “Set Link Password” to add a password to your Dropbox download folder.)
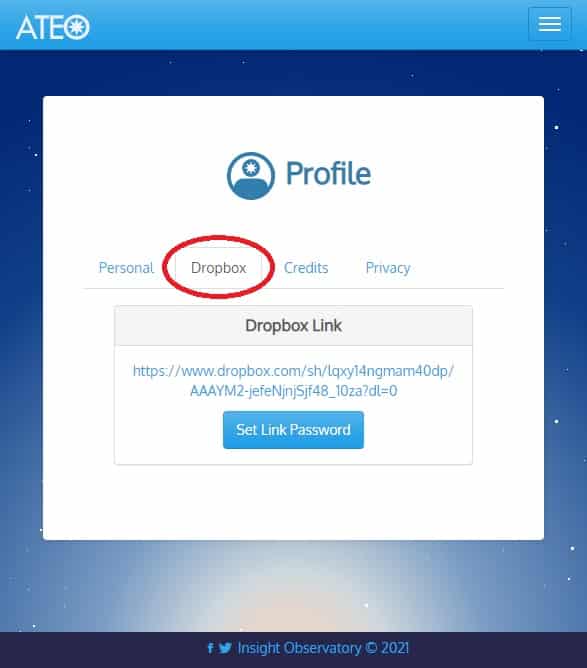
Above: Dropbox Link to Download Files
From the Dropbox link, you can then click “Download” to download all the files to your local computer. See the screenshot below, showing the files I received with my image request.
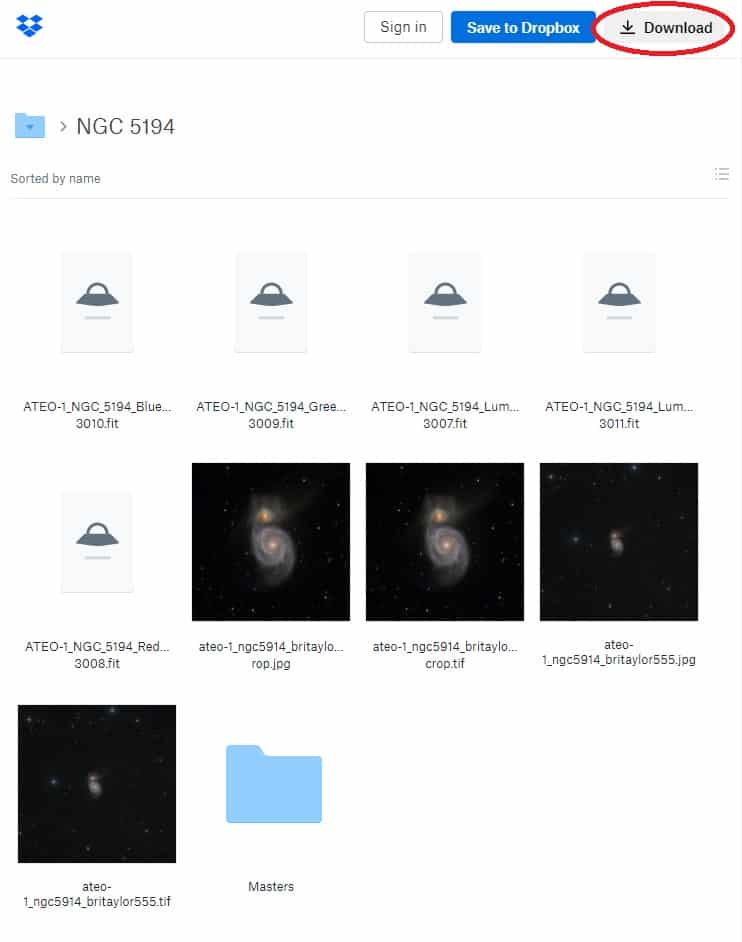
Above: Files Ready to Download (Main Folder)
As you can see in the screenshot above, I received the following files with my image request:
- Files for each exposure with the “.fit” extension – this is the raw image data from the ATEO-1 remote telescope.
- Several additional files with “.jpg” and “.tif” extension – these files are “processed” (completed) images. Insight Observatory offers pre-processed images at no additional charge as part of their service with all “Basic Image Requests” and “Educational Image Requests”. (You can use them in any way you choose. For example, you can use them as a “guide” or comparison for your own image processing, or you can just use these processed images instead of doing the processing yourself.)
- A “Masters” sub-folder (see below) containing master FITS data for the session.
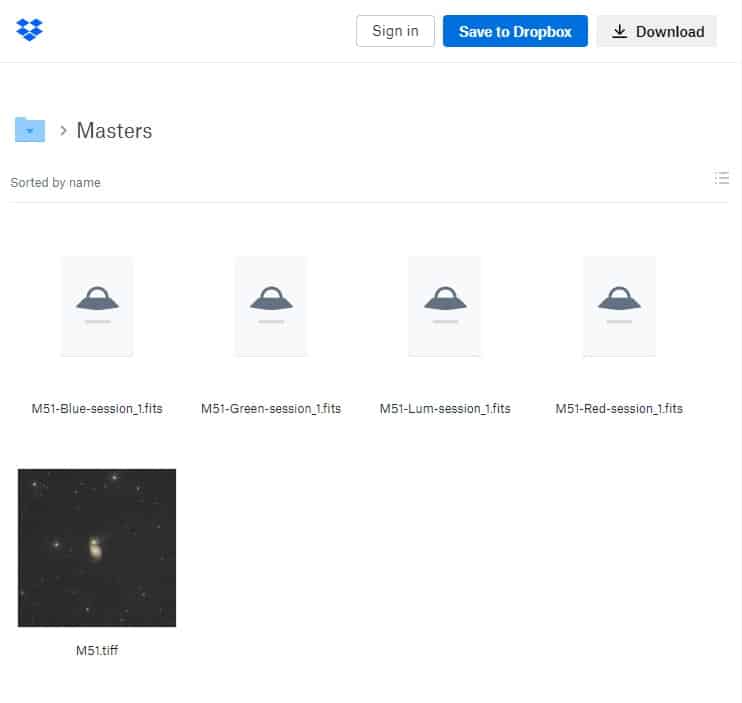
Above: Files Ready to Download (“Masters” Folder)
Download Calibration Files
Finally, go back to the email notification and click “Calibration Files” to download the baseline calibration data for the remote telescope (darks, flats, bias, etc.). These will be used in the final processing step when required.
4. Process your image data
There are plenty of good online resources for learning how to process the image data. (I won’t attempt to provide a full tutorial here.)
In general, the process will follow two basic steps:
First, if you collected multiple exposures, you’ll use software (like DeepSkyStacker) to “stack” them together. Stacking increases the “signal to noise ratio” in your image data and allows you to combine multiple exposures to create a final image that’s clearer and brighter compared to one single long exposure.
For more information on this step, here’s an excellent tutorial on using DeepSkyStacker: https://astrobackyard.com/deep-sky-stacker-settings/
Next, once you’ve finished the stacking process, you’ll use more conventional image processing software (like Adobe Photoshop) to bring out the colors and details you want to emphasize in the final image. In this step, the image “comes to life” with skill and artistry.
More processing resources:
- Complete processing guide for narrowband imaging: https://www.astrospaceguide.com/processing-guide-for-narrowband-imaging/
- Beginner’s guide to processing astrophotography images: https://www.skyatnightmagazine.com/astrophotography/astrophoto-tips/astrophotography-image-processing-beginners-guide/
5. Enjoy and share your final processed image
Here’s the final processed & cropped image of NGC 5194 from ATEO-1. I was really blown away by the beauty and detail that came out in the final image. Check it out below! (This is the version processed by ATEO staff and included with the “Basic Image Request”.)
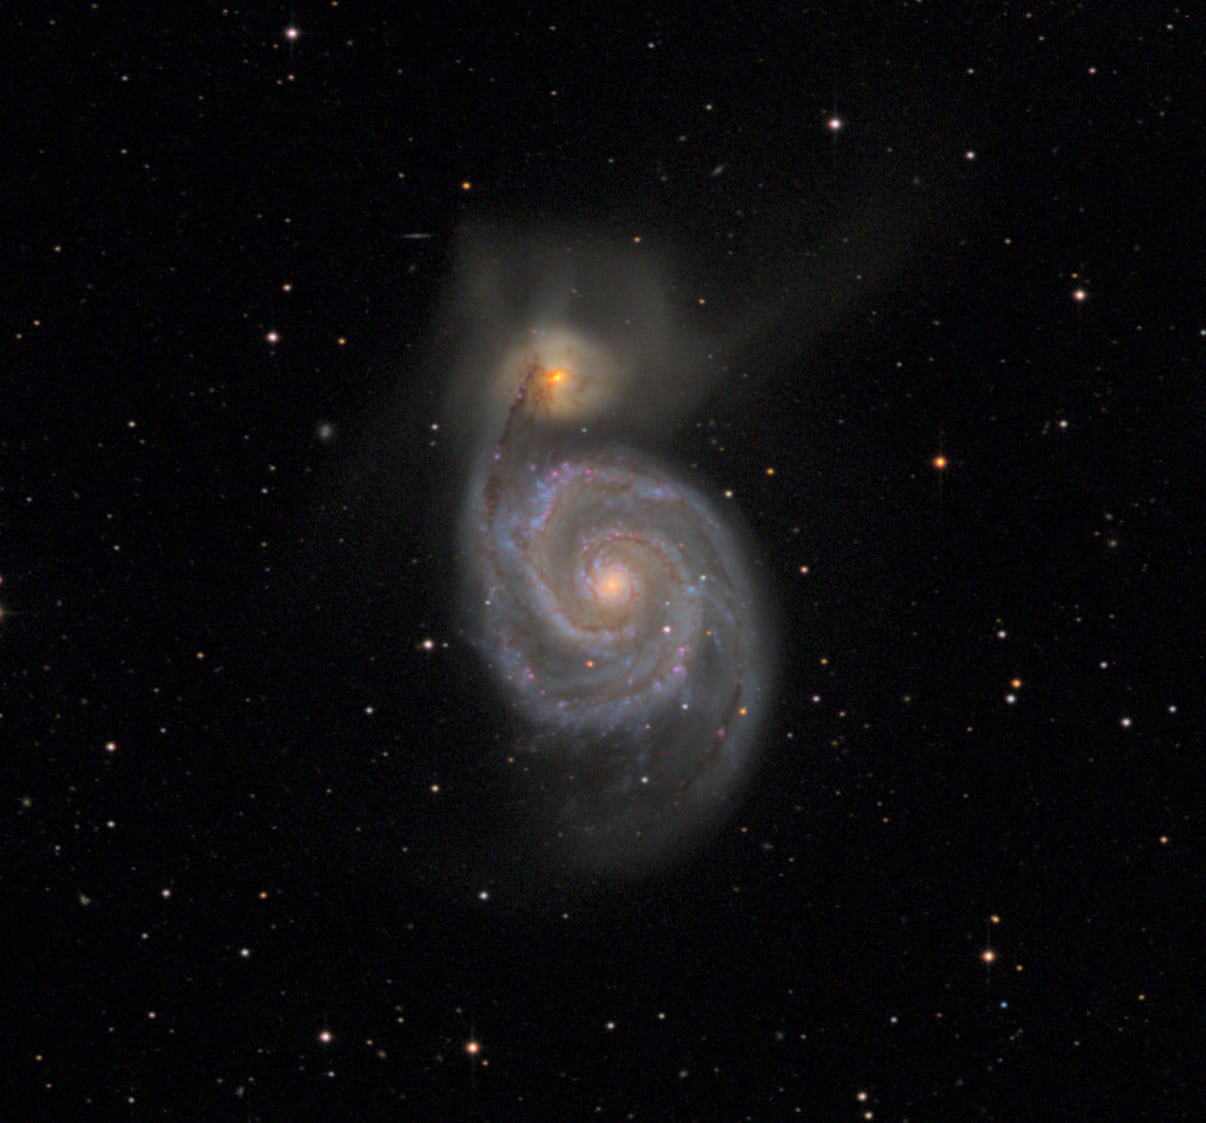
Above: NGC 5194 (The Whirlpool Galaxy, a.k.a. Messier 51) with Insight Observatory’s ATEO-1 Remote Telescope; 20 Minute Color Exposure
Final Thoughts | Using Remote Astronomy Telescopes for Astrophotography
Whether you’re a beginner looking to learn the end-to-end process of astrophotography, or an experienced astrophotographer looking to hone your skills, remote astrophotography telescopes offer a great way to take your hobby to the next level and expand your imaging possibilities.
It offers an affordable option compared to the cost of full astrophotography rigs. And, it offers wonderful flexibility for those looking to augment their personal gear with other locations, sky conditions, and variety of high-end equipment.
We hope you’ve found this guide to be a helpful introduction to the world of remote astrophotography telescopes. If you have any questions or comments, please reach out to us via our contact link in the footer of the page.
(Also, if you liked this article, please share it using the social media buttons below!)
Feature Image Credit: Insight Observatory

